Tuesday 18 August 2020

Build Me an Army Worthy of... Mordor

Hello readers, I have another 'Build Me an Army Worthy of...' post today. This time we look at the hugely versatile forces of Mordor. Once again, I have a 500pts and an 800pts list which I would bring to an EAHC event, the local fluffy yet still competitive community. For anyone in the East/South East of England, please join the East Anglia Hobbit Community group of Facebook so that you are aware of any events we have upcoming and can share your hobby work. We are always happy to see new faces at our events!

Before I share my first list, it is important to note that Mordor is a vast faction and I could have created countless lists which all achieved different things. Mordor is one of the most flexible factions in the game and its roster gives players access to many different play styles and approaches. For any new players reading this, Mordor is ideal for a beginner as it allows you to expand in many directions and will teach you most of the rules in the game. Anyway, let's march to war for Sauron!

Cirith Ungol-ish - 500pts

Shagrat with heavy armour and shield of Cirith Ungol
5 Black Numenoreans
5 Morannon orcs with spear and shield
1 Morannon orc with spear, shield and banner
1 warg rider with shield

Gorbag with shield
5 Black Numenoreans
6 Morannon orcs with spear and shield

Shelob

26 models

This force is largely inspired by Cirith Ungol, with the heroes all hailing from around that area of Mordor, but it deviates from theme with the inclusion of black Numeoreans. The Numenoreans could easily be traded in for Mordor uruk-hai if you wanted to fully commit to the theme. At 26 models, with all but 1 at D6 or higher, you have a hard to kill, well-numbered force to do the Dark Lord's bidding, not to mention a 6 wound monster.

The leader of this list is the powerhouse Shagrat. Despite having a quite ridiculous name, he has overcome that adversity to become quite possibly the best value combat hero in the game. For the points you pay, you get, rare for an Evil hero, 3s in all the right places (3 attacks, wounds, Might, Will and Fate). Not only that, Shaggers is great at cutting down enemies with his S5 and should always pick up heavy armour and his unique shield of Cirith Ungol to get to D7. With all that combined, Shagrat is already a strong offensive and defensive option to lead your Mordor forces. However, he further adds to his value due to a few extra rules. First, his shield of Cirith Ungol grants him the knockdown bonus when he charges as if he were cavalry. What's better than 3 S5 attacks? 3 S5 attacks with double strikes! Blood and Glory is the second rule which helps Shagrat shine. Giving Shagrat a point of Might back each time he kills an enemy hero, Blood and Glory means Shaggy-boy can hunt down your opponents low-mid tier heroes, Strike up to win the fight and then use his 6 S5 strikes to kill them and regain the Might he just spent. Very nice! 

Shagrat is backed up by 5 black Numenoreans. Possibly my favourite troops in the game, the Numenoreans are less killy than your Morannons at only S3 but they come with a whole host of other benefits. At FV4, D6 and causing Terror, they are an excellent front line troop. The FV4 helps you to match or sometimes better your opponents FV, an issue when only fielding orcs. Further, their solid D6 means they often hold their own when they do lose a fight. However, Terror is where the real benefit comes in. Even if only 1 or 2 enemies fail to charge, each failed charge tips the combat more in your favour. Facing a terror wall front line is a real pain for any player and the decent C4 the Numenoreans come with also help to combat any Terror your opponent has. Back them up with the great S4, D6 Morannon orcs to do the killing and you have a strong shield wall, complete with a banner for those crucial duel rerolls. The lone warg rider in the warband helps to add a little mobility for grabbing objectives or denying a key charge from opposition cavalry.

Next up we have Gorbag. I think Gorbag is a hugely underrated model and offers a lot for his points. On initial inspection, Gorbag has the very average orc captain profile but costs a little more for an extra Might point and access to Strike and Strength instead of March. FV4, S4 and 2 attacks is far from inspiring but it is through his special rule, Orcish Brawler, where Gorbag shines. Any time Gorbag is outnumbered in a fight (spear supports don't count), he gains +1 FV and A. All of a sudden, you have a 3 Might, 3 attack, FV5 hero with Strike for little more than a captain! The rule is easy to trigger when you have priority as you can just chuck Gorbag into two enemies and stick a spear support on him for 4 dice at FV5 in a duel. But is also creates a problem for your opponent if they have priority. If they charge Gorbag with 2 models, they increase his stats so don't want to do that. However, if they only charge him with one model, it gives you the opportunity to call a Heroic Combat with a good chance of winning as long as you have a spear support. You can then use this to move into two enemies and boost Gorbag anyway. All in all, Gorbag is a plucky little orc who you will find often exceeds your expectations. His waband is completed with a mix of black Numenoreans and Morannon orcs to further extend your dangerous, terror-causing shield wall.

The final warband is but a single model: Shelob. A divisive choice, Shelob is often the subject of debate for SBG fans as to whether she is excellent or a walking waste of points. For me, she is brilliant and gives you great tactical flexibility for a reasonable price. FV7, S7 and D7 is a super start and makes everyone's favourite giant arachnid a worrying prospect for your opponent. With 6 wounds, she is tough to wound and is able to move 10" whilst traversing obstacles without issue. So why the division? Well she only has 1 attack. Despite having 8 legs and a giant stinger, her 1 attack is an issue although Monstrous Charge does get this to 2A on the charge with Knock Down against all models. Further, Shelob has no Might of her own and suffers from the Survival Instinct rule, meaning every time she suffers a wound, she must pass a Courage test or flee the battlefield. At only C4, this is a concern but with 6 Will points, she is usually pretty safe. For me, Shelob is the ultimate distraction. Your opponent will always be worried when she is around, particularly given she also has the Venom rule meaning she rerolls all falled wounds in combat. She is great at picking up objects and her mobility, combined with access to Brutal Power Attacks like Hurl, means she is a constant thorn in the side for your opponent. 

This army brings great killing power and a strong, durable shield wall. The lack of March means you may face a few turns of enemy shooting but your high defence is usually enough to keep casualties minimal. When battle lines meet, your Numenorean/Morannon pairings should outperform your opponent whilst you heroes cut down enemy heroes (Shagrat) and troops (Gorbag). Shelob is your trump card to using wherever she is best needed. 


The Wraith and his Protege - 800pts

Shagrat with heavy armour and shield of Cirith Ungol
5 Black Numenoreans
5 Morannon orcs with spear and shield
1 Morannon orc with spear, shield and banner
1 warg rider with shield

Gorbag with shield
5 Black Numenoreans
6 Morannon orcs with spear and shield
1 warg rider with shield

Ringwraith (2/13/2) with horse
5 Black Numenoreans
6 Morannon orcs with spear and shield
1 warg rider with shield

Kardush
6 Morannon orcs with spear and shield
5 Mordor orcs with spear
1 warg rider with shield

52 models.

With 52 models, this 800pts force packs in great numbers as well as having a number of other tricks up its sleeve. The core force is the same as the 500pts list, with a Terror front line of black Numenoreans supported by Morannons and Shagrat and Gorbag leading the troops. Interestingly, all the heroes are Heroes of Fortitude so you can be flexible with who your leader is. I would usually go for the wraith as you can really chuck Shagrat into combat then but Shagrat is also a solid choice. So what do the additions to the list bring to the table?

First up, I'm bringing a standard wraith to the table. I always max out Might and Fate on wraiths and then tailor the amount of Will to the points size. At 800pts, 13 or 14 pts is a good shout as it gives you plenty of resources with which to hamper opponent's heroes. The spooky wraith uses the mobility of his horse to get where he needs to be and hangs behind the front line, wreaking havoc in relative safety. His Harbinger of Evil rule also lends itself well to the Terror front line, further messing up your opponent's tactics. 

The real star of the force though is Kardush. Kardush is a named orc shaman and comes with a few extra tricks when compared to his nameless brethren. First, he is a Hero of Fortitude as opposed to a Minor Hero. This open up six more troops slots for your army and removes one of the key drawbacks of orc shamans. An even bigger and more important difference between a nameless shaman and Kardush is his mastery of fire. Kardush the Flamecaller replaces the standard 5+ Transfix spell with the stupidly good Flameburst on a ridiculous 3+. This causes a S6 hit on the targeted model within 6" of Kardush. There are numerous uses for this: removing spear supports, unhorsing models, killing models holding objects and many more. A favourite of mine is to get the Ringwraith to compel a banner bearer so they are no longer in base contact with a friendly model and then get Kardush to light him up. If you succeed, Kardush has already paid for half his cost and your opponent has lost his important banner. One issue with orc shamans is that they only have 3 Will, just like Kardush. But he refuses to be restrained to only having 3 casting opportunities! Through his Heart of Darkness rule, Kardush can remove a friendly orc within 6" of him before priority to regain D3 Will points. That is why he has 6 Mordor orcs in his warband, all there to fuel Kardush's bonfire party. Even after all that, Kardush has one further bonus, you can sacrifice him through his Shadow Pawn rule. This rule removes Kardush and allows a Ringwraith regain D6 Will points. For a few points over a standard shaman, who you only bring for Fury which Kardush has anyway, it is a no-brainer to take this orcish pyromaniac!

This is a tough army to face on the tabletop. With good magical support and damage, a decent amount of Might, high defence troops, a terror causing front line and March to aide with mobility, it really covers most bases. It allows you to adapt your tactics and playstyle effectively and can deal with most threats effectively. When lines meet, let your troops hold their own as Shagrat and Gorbag apply extra pressure to the opponent. Just make sure you protect Kardush and the wraith from any Heroic Combatting heroes and they can spend the game Transfixing key models or, failing that, setting them on fire!


So there's my two Mordor lists. As mentioned at the beginning, there are so many more options to explore. Gothmog, his lieutenants and a horde of Morannons can be excellent, the Witch King is a wonderful leader and the Mouth of Sauron and Troll Chieftain in a Black Gate LL are all competitive choices for a Mordor army. What's your preferred flavour for Mordor?

Thanks for reading,

Kieran

Monday 10 August 2020

Build Me an Army Worthy of... Numenor (ish)

Hello readers, today we are going to look at 2 armies lists I would look to bring to an EAHC event, one at 500pts and one at 800pts. As mentioned previously, the EAHC is a growing community and, despite a clear focus on fun and fluff, we have a number of skilled players so these lists are designed to compete effectively in a reasonably competitive environment. Now last week we looked at 2 lists for my first Evil army in the game in Angmar. This week, I have built to lists around the Good army I first played when joining the EAHC at the beginning of last year: Numenor. My first list is 500pts pure Numenor but my 800pts list drafts in some support from Numenor's only Green Alliance, Rivendell.

Isildur, the Invisible King - 500pts

Isildur with horse, shield and The One Ring
6 Warriors of Numenor with shield
4 Warriors of Numenor with spear and shield
5 Warriors of Numenor with bow and spear

Captain of Numenor with horse, heavy armour, shield and lance
11 Warriors of Numenor with spear and shield
1 Warrior of Numenor with spear, shield and banner

With 29 models, this list achieves good numbers for 500pts but those numbers are needed when you factor in that the warriors with shields are only D5 and the ones with bows are D4! Warriors of Numenor are great at killing the enemy thanks to their innate S4 and F4 to win fights but, when they lose a fight, they die very easily. By bringing higher numbers, you can mitigate a few losses and ensure you have a good number of dice in each fight.

Looking at the first warband, we have Isildur. Now we could have gone for his powerhouse father, Elendil, who is quite frankly insane. However, he is very expensive and would have left us very short on numbers. Equally, thanks to his father, Isildur is often overlooked but could possibly be the best value hero in the game. He saves enough points to bring an extra 6 warriors over his father but also brings a host of other perks to the tabletop. At FV6, he is comfortably winning most fights on FV, although a particularly small, shiny piece of wargear makes his FV6 unbeatable but we will get to that later! Built in S5 with 3 attacks, 4 on the charge whilst mounted, and 3 Might points to use will melt most enemies, however he can also go 2-handed with his hand and a half sword should he feel the need to. I don't think I have ever done so but I can see there are a few niche occasions where the flexibility comes in handy. Offensively he is a bit of a monster, however things continue to impress when looking at his defensive capabilities. With a shield, Isildur reaches a mightily impressive D8 and has 3 Wounds and 2 Fate to fall back on if he is ever bested in combat or targeted at range. Further, his 2 Will give him a solid chance of brushing off pesky spellcasters but he improves this further by giving himself, and those Numenoreans within 6", Resistant to Magic thanks to his Numenorean blood. 

Isildur is a great leader thanks to his stat line but things only get better when you take him without his father as this allows you to get The One Ring. Representing the time period after the fall of Sauron when Isildur is the High King of Gondor and Arnor, having access to The One Ring makes Isildur the ultimate assassin. Costing 0pts, The One Ring lets Isildur turn invisible, walk through the control zones of opponents and target their key models. Not only that, the Ring halves the FV of all opponents, other than the Ringwraiths, after any Heroic Strikes meaning Isildur's FV6 will always be the highest. Not only that but it means that models must pass a Courage check at -1 per inch away from Isildur to test whether they can see him to charge him and makes sure he can't be targeted by ranged attacks. All together, that is immensely hard to deal with! There are some drawbacks, for example Isildur can't put the Ring on whilst mounted otherwise the horse bolts but you can stay mounted for most of the game and dismount to use the Ring if it is required. The biggest issue happens at the start of the turn where Isildur rolls a D6 and on a 1-2 is lost to the Ring for one turn, giving control to your opponent. You can use Might to alter this roll however I find it is useful to use the Ring when needed and then, next turn, remove the Ring with a Courage test (at C7 with the Numenor army bonus) to continue as normal until it is required again. All in all, particularly at 500pts, Isildur is a boss.

Backing up Isildur are a host of Numenorean Warriors. At F4, S4 they are strong troops, particularly for a Good army. Arming most with spears allows them to support where required and having a small number of bows applies a but of pressure to the opponent. The bow armed warriors are great for objective holding but don't forget, just because they have bows, they are strong combat warriors so get them stuck in if you don't need them to hang back.

In the second warband, we have a further 12 Numenoreans, 1 armed with a banner to add an extra dice to duel rolls where required. They are following the lead of a Captain of Numenor. Captains in a Numenor list are very well-costed and add much needed mobility. With no cavalry warriors, the Captains get to ride on horseback and gives access to Heroic March to help with positioning. However, the Captain really shines as a troop killer. At FV5, S4 and 2 Attacks, he is already good on the charge whilst mounted but giving him a lance means he is mowing down D6 troops on 4s. Add heavy armour and a shield for a strong D7, the Captain works his way through enemy troops and low-cost heroes whilst Isildur cuts of the head of the snake by hunting the enemy big boys. 

The list certainly has its concerns but has proven to be very effective at cutting through opposing armies. Try to save Isildur's Might for key combats or The One Ring rolls and use the Captain's Might for Marches if needed, otherwise key Heroic Moves. Once in combat, this army kills quickly but dies quickly too so try to push the odds in your favour where possible with the banner and spear support and don't be afraid to shield if it buys you time to outmanoeuvre the enemy. Isildur is the big trick in the army and can be relied upon to pull his weight, you just have to make sure you use him to his fullest. Sometimes staying mounted and not putting the Ring on is the better option.


The Last Alliance Reforged - 800pts

Isildur with horse, shield and The One Ring
10 Warriors of Numenor with spear and shield
2 Warriors of Numenor with bow

Captain of Numenor with horse, heavy armour, shield and lance
7 Warriors of Numenor with spear and shield
1 Warrior of Numenor with spear, shield and banner
2 Warriors of Numenor with bow

Glorfindel with Asfaloth and Armour of Gondolin
11 elves with shield
2 elves with bow
2 Rivendell Knights with shield

Certainly not the fluffiest of lists but a very strong one! Adding in Glorfindel and as many elves as possible adds a lot to a Numenor army. It is possible to play a pure Numenor army at 800pts but it struggles a lot and so, by adding in a Rivendell contingent, you compliment the strengths of Numenor and plug a few weakness. Isildur and the Captain, along with their warbands, fulfill the same roles as above, although you want to make Glorfindel the leader so that Isildur can do his invisible butchering without giving up VPs if things go south. So what do the elf boys bring?

Glorfindel is amazing. Straight up baller of an elf lord. F7, 3s in all the right places and on a 12" horse that ignores forests. Where can I sign up?! With D7 and an elven blade, on the rare occasions he loses a fight, he is pretty safe. But what if the enemy have spellcasters? Well, with Unbending Resolve giving Glorfindel 2 free resist dice a turn to supplement his 3 Will, he laughs at the petty magic thrown at him. Oh but what about those big scary monsters that can Rend? With the Armour of Gondolin, Glorfindel cannot be subject to Rend, or any other Brutal Power Attack which targets him, so get him stuck against those Fell Beasts and Troll Chieftains. Coming in at cheaper than Gil-Galad and Elrond, the other two big elven lords, Glorfindel is arguable the best all-rounder and definitely the best value for his points cost. Having him and Isildur together is a real headache for an opponent.

Backing up the glorious pointy-eared legend that is Glorfindel, we have a couple of High Elf bowmen who can sit on objectives and try to snipe enemy heroes' horses and 11 elves with shields. They don't need spears as they will become your front line. Having the FV5, D6 elf with an elven-made sword at the front supported by the S4 Numenorean at the back creates a mini deathball combination. You are rarely ever going to lose a fight due to having higher FV and an elven-made weapon and you have a S4 attack to kill your opponent. Further, if you are up against FV3 opponents, you can faint with the elf to help with killing or risk going 2-handed for plus one to wound. It is a great combo which has won me many a battle. The final piece to the puzzle are 2 Rivendell Knights. The Knights add much needed mobility, an extra killing power punch where required with their lances and cavalry charge denial to further plug the gaps of Numenor.

This army is rather elite but stills clocks in at 40 models so won't find itself massively outnumbered in most circumstances. The backbone of this army are the elf/Numenorean SWAT team pairings as they will hold their own and grind down the opponent. However the combination of Glorfindel and Isildur is a huge threat and, even before factoring in The One Ring, they can go toe to toe with the best heroes of Middle Earth. Use your warriors to win the attrition war and your heroes to strike at enemy heroes where possible. Remember, use The One Ring at the right time for maximum effect.

So there you have it, two lists based largely around Numenor, although one with a little Elvish twist. There are plenty of other ways to play Numenor, Elendil being an obvious route, but I enjoy building around Isildur. Further, the other elven lords are fun to use, in fact at 800pts you can have a very fun Last Alliance army with Elendil and Gil-Galad with full warbands which I have greatly enjoyed in the past. Thanks for reading!


Wednesday 5 August 2020

War for the Westfold: An 800pts Riders of Theoden vs Army of Dunland Battle Report

Today we have a battle report write up for you all. We are starting with a nice themey one as the Riders of Theoden Legendary Legion clashes with their mortal enemies in the Army of Dunland Legendary Legion. I was delighted to welcome fellow EAHC player Sam Huddy over with his lovely Dunland models, including a great scratch-built crebain model and a warband of Dunlending warriors converted to have scavenged Rohan wargear to further fuel the fire between the two forces. I know Sam had been itching to get his hands on my Riders of Theoden forces after missing out in the last couple of tournaments before lockdown hit so we took the opportunity to see who would be victorious. 


Army Lists

Riders of Theoden

Theoden with armoured horse, heavy armour and shield
2 Rohan Royal Guard (RRG) with horse and throwing spears

Eomer with armoured horse and shield
2 RRG with horse and throwing spears

Deorwine with horse
2 RRG with horse and throwing spears

Gamling with horse and Royal Standard of Rohan
2 RRG on horse

Elfhelm on horse
Dernhelm
1 RRG with throwing spears

Captain of Rohan with horse, heavy armour and shield.
1 RRG on horse

With 6 warbands, 8 heroes (thanks to Eowyn and Merry in the Dernhelm profile) and only 18 models, I went with an elite, hard-hitting force. The aim was to maximise Theoden's Death! rule and burn through the 20 Might I started with to wipe out the Dunland army in 1 or 2 key charges. I thought the best way to avoid the +1 to wound from the Hatred Rohan rule, as well as the Dunlending War Cry from Thrydan for an extra +1 to wound for 1 turn, was to kill enough to avoid a war of attrition. With Gamling's banner supplementing my Might and free Heroic Combats from Deorwine, I was hoping to use around 35 Might points throughout the game.

 Army of Dunland

Thrydan Wolfsbane with horse
6 Huscarls 
1 Crebain

Gorulf Ironskin
4 Dunlendings with shield
3 Dunlendings with bow
1 Dunlending with shield and banner

Frida Tallspear
4 Dunlending horsemen
4 Dunlendings with 2 handed axe
2 Dunlendings with bow

Wildman Oathmaker
6 Wild men
6 Wild men with 2 handed axe

Dunland Chieftain with axe and shield
4 Dunlendings with 2 handed axe
4 Dunlendings with bow
3 Dunlendings with shield
1 Dunlending with shield and banner (Sam had converted this banner as a tattered and defiled Rohirrim banner which was a nice touch)

Sam's army still had a strong amount of Might with 14 points available but he definitely had the edge when it came to numbers. With a massive 54 model force, his force was 3 times to size of the Rohirrim army! With an army wide +1 to wound (+2 to wound with the War Cry added for one turn) and the potential for 2-handed piercing strikes across the army, it had the potential to slice through the Rohirrim. With 2 banners which provide 6" re-roll auras each, Sam was hoping to use numbers to give him the advantage in winning fights to cut down the Forgoil. However, with FV3 across most of the army and a lack of any significant number models that can spear support, winning fights against the FV4 or higher Rohirrim may be the challenge.

Divide and Conquer

We rolled for scenario and found out we would be playing Divide and Conquer, a new scenario from the Matched Play Guide. Neither of us had played the scenario before so we were excited to get going. VPs were available for controlling objectives, with up to 5VPs for controlling the objective in the centre of the table and up to 2VPs eah for the objectives 12" either side of the middle one. The final few VPs up for grabs could be earnt through breaking the enemy (1VP) or by wounding or killing the enemy leader (1VP or 2VPs respectively). It became clear that Sam's Dunland would have the numbers to hold the objectives early on but, with a random game end on a roll of 1 or 2 after one army is broken, I hoped to wipe him out quickly enough to swing the battle in my favour.

The deployment roll-off went to Sam and he deployed his first warband. The deployment for Divide and Conquer is unique in that each player is allocated 2 table corners diagonally opposite to each other and deploys 1 warband at a time in alternating corners. This effectively splits you army in 2, within 12" of each corner. After deployment, Sam had Thrydan, Gorulf and the Rohan-hating Chieftain in one corner, whilst Frida and the Oathmaker teamed up in the opposite corner.

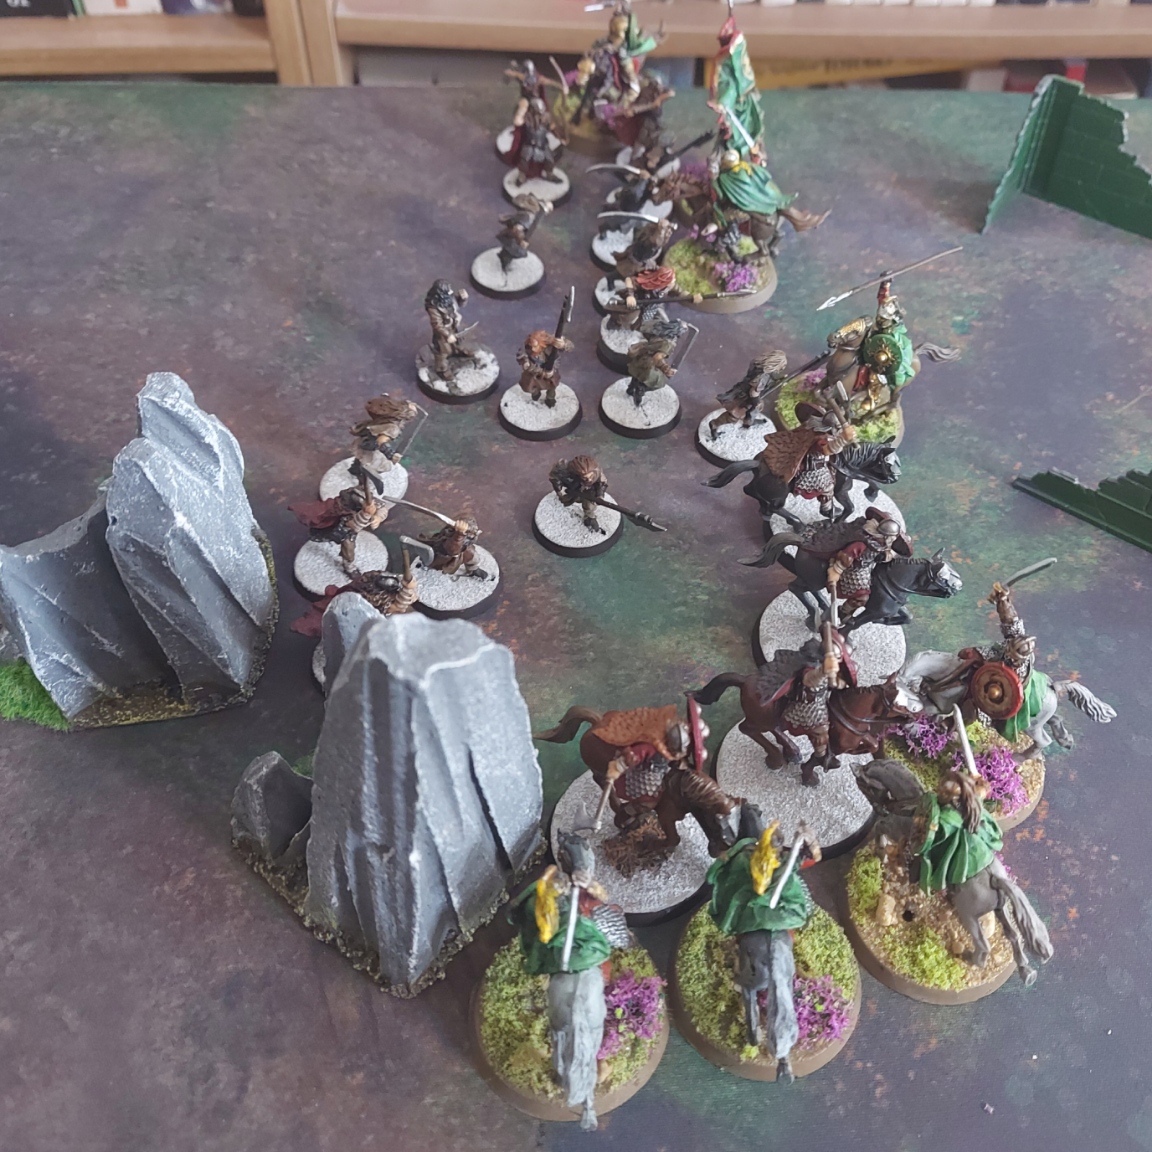
My Rohan had deployed with King Theoden leading a scary strike force with Eomer and Deorwine. Opposite them in the other corner, Gamling, Elfhelm, Eowyn and Merry in their Dernhelm disguise and a Rohan Captain were ready for battle.


Turn 1

With Dunland winning priority, Heroic Marches were called by the Dunland Chieftain, as well Theoden and Gamling. The Dunland force lead by Thrydan moved toward the centre of the battlefield as fast as they could, whilst Frida and the Oathmaker pressed towards their nearest objective. In response, the Rohirrim identified the weaker half of the Dunland army and both halves Marched towards the force lead by Frida and the Oathmaker. By the end of the first turn, Rohan was already enclosing on its hated foes.


Turn 2

With Rohan winning priority, the Oathmaker sensed the impending danger and called a Heroic Move with his first Might point. Realising the enemy were mobilising, Gamling countered with a Move of his own for his 2nd Might point. The Oathmaker was a little too quick for Gamling and got to organise his warriors first. Spotting the flanking force lead by Theoden, the Oathmaker reassembled the Dunland shield wall in front of Gamling, Elfhelm, Dernhelm and the Captain, leaving Theoden and his forces too far away to affect the battle this turn. With a wall of Dunland bodies lined up before them, and a small contingent of Dunland cavalry flanking around the side, the Rohirrim took the opportunity to charge. Gamling, not calling With Me!, used his Heroic Move to charge a lone wild man. Following the Royal Standard into the fray, Elfhelm bore down upon 2 Dunlending warriors, launching his throwing spear as he charged. Unsurprisingly for one so skilled with the spear, Elfhelm claimed first blood as he felled the first Dunlending and charged past his fallen body as he slammed into a warrior and wrapped around into the archer behind. The rest of that half of the Rohirrim force charges, with Dernhelm avoiding Frida Tallspear in favour of 2 wild men whilst the captain and a few RRG charged into the Dunland cavalry in an attempt the rob them of some mobility by cutting down the riders.


Theoden, Eomer and Deorwine repositioned behind the Oathmaker and his force, ready to join the fighting next turn, whilst Thrydan and his half of the Dunland army rushed to the centre objective.

Shooting resulted in a hail of throwing spears felling 2 wild men as Theoden's force made his presence felt. However, it was the combat phase where things got really bloody. Following their charge, Elfhelm, Dernhelm (Merry) and the Captain all called Heroic Combats, hoping to strike a decisive blow. With no Dunland heroes in combat to help, the Rohan commanders unleashed their fury. All three were successful with their combats, felling 4 wild men, 2 Dunlending warriors and 2 Dunlending horsemen between them. The accompanying RRG also managed to take down some more enemies with no casualties suffered in return. A huge blow had been strike and half of the Dunland force was wavering.


Turn 3

As the battle reached turn 3, the number of Dunland dead reached well above double figures and Rohan were as of yet unscathed. Priority once again went to Rohan. Realising that another charge would decimate her forces, Frida called a Heroic Move which was promptly countered by Gamling. The roll off would be key as most of the Rohan forces would be denied their charge bonuses and the beleaguered Dunland forces may also be able to escape the follow up charge from Theoden and his force. As the die was rolled, it settled on a 1 and gave Frida the opportunity to grant the Army of Dunland a slight reprieve. Taking the initiative, Frida charged straight into Dernhelm and a RRG as her warriors followed her into battle. The Oathmaker pounced on Gamling with 2 wild men as a third wild man tied down Elfhelm. Whilst the rest of the Rohan models were tied down into combat, a couple of Dunland warriors repositioned to cut off Gamling from any Heroic Combat support. With no Might remaining, the Royal Standard was in danger. Following the heroic move, the RRG with throwing spears lined up to unleash as second volley, aiming to remove the 1 model blocking a path to Frida and the Oathmaker so that Elfhelm, who had been joined by Eomer against a single wild man, could use a Heroic Combat to save his comrades. Whilst chaos ensued, Thrydan and the larger Dunland force bunkerd down in the ruins surrounding the central objective whilst a small force of three archers secured the side objective furthest away from the Rohirrim. 

The shooting phase was pivotal for Rohan this turn. Unloading 6 throwing spears into a single wild man, a single spear found its mark and buried itself into the unfortunate foe. The space was opened up to save Gamling. In the following combat phase, Elfhelm called a Heroic Combat with his 2nd Might point and Eomer used his 1st Might point to call a Heroic Strike. Recognising the need to get their strikes in before they found themselves surrounded, Frida and the Oathmaker both spent the 2nd of their Might points on Combats of their own. In the crucial roll off, it went to Rohan. Promptly striking up to FV10, Eomer cut down his foe and charge into Frida to support Dernhelm, as of yet oblivious to the fact he was saving his sister! Elfhelm used his movement to ride in support of the Royal Standard and peel off the Oathmaker from Gamling. 


Unfortunately for Dunland, the Rohirrim proceeded to put on a combat masterclass. Losing no casualties in return, Elfhelm cut down the Oathmaker, Eomer and Dernhelm made light work of Frida who (despite cancelling Eomer's cavalry bonuses) found herself trapped against 7 attacks and Gamling even managed to remove his two assailants with some effective dice rolling. The Captain and RRG followed their leaders' examples as cut down their enemies. By the end of the turn, 2 of the 24 Dunland models in this half of the force remained as the Rohirrim continued unscathed. Dunland's only hope was to hold the objectives with still superior numbers and deny Rohan VPs whilst hoping for the game to end early when broken.

Turn 4

As turn 4 arrived, the battlefield was littered with the dead of Dunland but no quarter would be given against their most hated enemy. Rohan once again won priority and, having spotted Thrydan had over-extended himself in the centre, Dernhelm and 2 RRG pounced. The rest of the Rohan force lined up to assault the central objective as a lone royal guard secured the nearest side objective. Gamling and Elfhelm - both with 1 Might restored thanks to the Royal Standard - took 5 RRG with them to finish of the last 2 wild men. 


Spotting their leader in danger, the Dunland force surged forward through the ruins, fuelled by resentment, but were too far to intervene. As a result, they positioned themselves ready for the inevitable Rohan charge the turn after. The crebain were able to rush to defend Thrydan however, pecking at the eyes of a RRG and drawing him off of Thrydan. 

The Dunland bow fire, ineffective so far, this time managed to hit both Theoden and Deorwine. Hoping to unhorse the Horse Lords, both arrows missed the mounts and struck the riders themselves. Luckily for the Rohirrim, their armour held and both heroes were left unscathed. In the combat phase, Gamling called a Heroic Combat, knowing the Royal Standard would inspire him to further acts of Might next turn and promptly butchered the last two wild men. He moved to support the front line with his RRG and Elfhelm. More importantly, both Dernhelm and Thrydan called Heroic Strikes. As the dice settled, Thrydan had struck up to FV7 but Dernhelm, clearly inspired to prove her value, reached FV10. With a RRG in support, things looked positive for the disguised shieldmaiden of Rohan. Duel rolls commenced and Derhelm only managed a high of 4. However, Thrydan only rolled a 4 high too! With 1 might left on Dernhelm, Thrydan spends 1 of his remaining 2 to win the fight. Dernhelm, knowing Thrydan will spend his last Might, spends her last point to force out Thrydan's final Might point. Having used all of his Might to win the fight, Thrydan was really hoping to score a wound on Eowyn, particularly given his Mighty Blow rule means it inflicts two wounds. Striking Eowyn, he finds his mark and the shieldmaiden falls lifeless to the ground as she fails both fate rolls with a double 1. As Merry tumbles to the ground, Thrydan is surprised by the extra body in front of him and fails to land a blow on the hobbit. From across the battlefield, Eomer's world stops as he spots the lifeless body of his sister on the floor. He is filled with rage and something within him snaps. He will now charge every opportunity he gets but also receives as nasty +1 to wound.

Turn 5

As turn 5 arrives, only 1 Rohan model has fallen but it is an important one. Rohan wins priority and Eomer, in a red rage, charges the Dunland Chieftain, who has the gall to be wearing a RRG cloak and helmet whilst wielding a Rohan shield. Merry stands ominously in front of Thrydan, hardly filling the gap left by Eowyn.


Filled with sudden bravery, he charges headlong into the centre of the Dunland force, ending in base contact with the muscled form of Gorulf Ironskin! The main Rohan force ploughs into the Dunland lines as Elfhelm leads the way with a charge into Thrydan, once again using his expertise with the throwing spear to unhorse the Dunland leader. With Thrydan vulnerable without his horse, Theoden charges his Dunland counterpart as Deorwine moves round the flank and into more Dunlending warriors. With the RRG tagging as many foes as possible, the Captain and a royal guardsmen head toward to furthest objective in an attempt to remove the small Dunland archer force encamped there. Gamling moves to support his king by providing his banner effect to his fight as well as Eomer's.


Shooting is once again ineffective as a couple of arrows bounce off of the Rohan Captain's armour. As combat begins, both leaders use the opportunity to call their special rules. Death! and the Dunlending War Cry are unleashed. As all Dunland models within 12" of Thrydan receive a further +1 to wound for the turn, Eomer, Deorwine and Elfhelm are all inspired by their King and call free Heroic Combats as the king himself calls a free Heroic Strike to ensure the FV advantage over Thrydan. Gorulf uses his first Might point to call a Heroic Combat against Merry who is now surrounded by the hulking Gorulf and 5 Dunlendings! The roll off goes to Rohan and the furious Eomer proceeds to slice up the Chieftain and another warrior as he crashes into another Dunlending. Gorulf's Heroic Combat is next and Merry proceeds to shield with his 1 attack as he suddenly regrets the previous rush of blood to the head. He manages to roll a 6. Gorulf's attacks only achieves a 4 high but he isn't worried as he has 5 attacks from his allies and a banner reroll ahead. Amazingly (although any of you who know Sam and his horrible track record with dice rolling will be less surprised), despite having 6 more dice to roll, the 6 evades Dunland and Merry wins, until Gorulf spends his last 2 Might points to avoid being embarrassed by the small hobbit! Inevitably, Merry is hacked down and joins Eowyn on the casualty list. Using his Heroic Combat move, it is realised that a small path has opened up to Gamling and Gorulf takes the chance to pounce on the Royal Standard bearer. Spotting the danger, Theoden Strikes up to 10 and helps Elfhelm win his Heroic Combat against Thrydan, who Elfhelm promptly dispatches. With their leader dead, no Might on the table and having been robbed of their extra +1 to wound due to Thrydan's death, things get worse for Dunland as Theoden and Elfhelm spot the opportunity to jump to Gamling's side against Gorulf. Deorwine continues the trend with a successful Combat and slices up 2 Dunlendings before charging another 2 who meet the same fate. Gorulf is cut down by the combined might of Theoden, Elfhelm and Gamling whilst the only positive for Dunland arrives as 2 RRG are cut down, one having had his eyes pecked out by the vicious crebain. As the battlefield is surveyed, the Dunland forced are clearly broken and find themselves leaderless going into turn 6.

Turn 6

With no heroes on the board, Dunland win priority but Rohan call a Heroic Move with Gamling, who is also giving Elfhelm a Might point thanks to the banner this turn. With charges guaranteed, the Eorlingas start to clean shop. After a number of Dunlendings flee the battlefield, a host of Heroic Combats cut down 8 further warriors of Dunland. Victory is assured for the Riders of Theoden as only 3 Dunlendings and the crebain remain on the battlefield for the Army of Dunland. Unfortunately for Sam, the dice gods are cruel and the game continues (one of the few times he hasn't rolled a 1 or 2 this game!).


Turn 7

With priority once again going to Rohan, the final few charges are made as Eomer joins the captain against the 2 archers on the objective. 


As the final Dunlendings are cut down, the battlefield is covered in Dunland dead. Having wiped the enemy from the board, protected their leader and secured all of the objectives, the Rohirrim scored a heroic 12-0 victory. Surely a song will be sung in the Golden Hall of Meduseld of this victory, although the loss of Eowyn and the brave Merry means that Theoden will be adding another funeral mound outside the wall of Edoras.


Conclusion

A swift and brutal battle, the game was decided early through a combination of effective Heroic Combats to wipe out half the Dunland force without casualty and Sam's trademark awful dice rolling. The turn where Eomer and Elfhelm were able to Combat through to the Oathmaker and Frida was key and allowed the Rohirrim to build unstoppable momentum.

Rohan casualties:


Dunland casualties:


A fun, albeit rather one-sided, battle. Despite fears over the +1 to wound, the Rohirrim prevailed and, once again, the Riders of Theoden proved to be a very strong Legendary Legion. I want to thank Sam for the game and bringing along his lovely Dunland force. I am sure they will get their revenge in the future!

Monday 3 August 2020

Build Me an Army Worthy of... Angmar

In these 'Build Me an Army Worthy of...' posts, we will be looking at creating 2 lists that I would look to bring to an EAHC league event. Our events are good-spirited but competitive so most lists people bring are strong but avoid too much filth, although many players are fully committed to fun, fluffy lists in the local community. In the EAHC almost all of our events are 1-day and sit between 400-800pts so I will be crafting a 500pts and an 800pts list in each post. 

In this first post, I will 'Build Me an Army Worthy of... Angmar.' Now Angmar is my original evil army and brought me reasonable success. I love the range of special rules aimed debuffing your opponent and shutting down their key units. The fun (or frustration for your opponent) in an Angmar list comes from utilising your spells and rules to blunt your opponent at every step. It's an entirely unique play style within MESBG rules and can be a challenge to play successfully. However, when you get the synergies going, you end up with a terrifying host of orcs, spirits, monsters and wraiths.


The Witch King Rising - 500pts

The Witch King (3/14/3) on armoured horse with the Crown of Morgul.
2 orcs with shield
2 orcs with two-handed weapon
3 orcs with spear
1 orc with spear, shield and banner
1 warg rider with shield
2 dead marsh spectres

Orc Captain on warg with shield
2 orcs with shield
2 orcs with two-handed weapon
4 orcs with spear
1 warg rider with shield

Barrow-Wight
2 orcs with shield
2 orcs with two-handed weapon
4 orcs with spear
1 warg rider

This 32 model list brings along the OG of Angmar, big daddy Witch King. The Witch King provides immense versatility to any list and can be kitted out to fill a huge number of roles, In this army, as with a lot of Angmar armies he is in, he is both your harassing spellcaster and your hero assassin. With a solid amount of Will and the always vital 3 Might (a must in an Angmar list), he can support your army from a distance, safely chucking out a few key transfixes and black darts with great reliability thanks to his pointy crown. After weakening the enemy heroes and managing to transfix them (or even better, paralyse with the Barrow-Wight), he becomes the scalpel which carefully removes the pesky opposition. The armoured horse adds a bit more protection from most bow-fire and gives the Witch King the mobility he requires. At 500pts, there isn't much that can reliably take him on. 

He is ably support by a core of 8 orcs who are there to grind down opposition troops and grab objectives, as well as 1 providing the must-include banner in the army. There is an argument for shields on the spears (for me, D4 to D5 is negligible) and no two-handed weapons but I like the versatility the 2 handed weapons give you. First they help with tough D6 opponents but also synergise fantastically with the Barrow-Wight. You don't care about a -1 penalty to your duel roll when you don't need to roll in the first place! They are great at jumping on the helpless, paralysed bodies of enemy heroes (or banner bearers if you are feeling particularly mean). The warg rider is there for some mobility and he can be used to deny cavalry bonuses or to knock-down enemies where required, being S4 also helps significantly! The final piece in Mr. King's warband are 2 spectres. The spectres 'A Fell Light is in Them' rule has the potential to be insanely good. It struggles against elves and fails outright against bodyguard models but the opportunity to move enemy models their full move away is great. You can move away banners, spear supports or low-courage heroes to hamper the enemy but the real joy comes when you move a model out of a prepared spear wall and in to charge range, allowing Heroic Combat slingshots into heroes your opponent thought were safe, or when moving a model with a relic or off an objective in a key turn. It's always worth bring a couple along to widen your options.

The second warband brings along a further 8 orcs to add more numbers and an extra warg rider as well as the important Orc Captain. Now Orc Captains are, essentially, rubbish. Their stats are average (and that is being kind) but they fulfill a hugely valuable role. I have chosen to avoid bringing any bows in my army so the Heroic March available from the Captain allows the army to close the gap quickly. It also come in handy against other armies lacking ranged threat as you can use the extra mobility from Marches to apply pressure where needed or use the Captain's Might for Heroic Moves, allowing you to preserve the Witch King's Might for more effective uses.

The final warband brings the same warrior composition as the Captain but is lead by one of the most iconic Angmar models in the game, a Barrow-Wight. A terrible fighter with no Might, the Barrow-Wight brings three other things to the table; high courage, terror and, by far the most important, paralyse. First, the high courage of 6 helps to keep your orcs on the battlefield if you are broken with a key Stand Fast. Second, the Barrow-Wight itself is terror causing which can be a pain for the opponent but, crucially, it also provides a 3" terror aura for all orcs thanks to the army bonus. Sit the Barrow-Wight (and the Witch King) just behind your orcs and you can easy have a 10" front line of terror causing orcs. Fantastic! Finally, paralyse. Oh my what a crazy little spell. 4+ to paralyse your opponent and render them useless for potentially the entire game - although, given they automatically lose fights, they rarely last the turn - unless they get lucky with dice rolls. Combined with the Witch King slinging spells around, your opponent ends up having to save their Will to resist a paralyse and be bullied by the Witch King all game or resist the Witch King and end up helpless on the floor and hacked to bits by measly orcs. Always bring along at least 1 Barrow-Wight but at 500pts, where you often only have 1 big enemy hero to shut down, the Barrow-Wight is insane. 

This army should look to use the Captain's March to manoeuvre into position, harass the opponent with a barrage of spells from the Witch King and Barrow-Wight and remove the opponent's heroes from the board early. When it has achieved that, it's a case of grinding down the opponent whilst continuing to put the odds in its favour with well-timed spells in key areas. 


The Witch King Reigns - 800pts

The Witch King (3/16/3) on Fell Beast with the Crown of Morgul.
2 orcs with shield
2 orcs with two-handed weapon
3 orcs with spear
1 orc with spear, shield and banner
1 warg rider with shield
3 dead marsh spectres

Orc Captain on warg with shield
2 orcs with shield
2 orcs with two-handed weapon
4 orcs with spear
1 warg rider with shield

Barrow-Wight
2 orcs with shield
2 orcs with two-handed weapon
4 orcs with spear
1 warg rider

Barrow-Wight
2 orcs with shield
2 orcs with two-handed weapon
3 orcs with spear

Shade 
2 orcs with shield
2 orcs with two-handed weapon
4 orcs with spear

At 800pts, I take the themes of the first list (magic dominance, attrition and control) and turn them up to 11! The Witch King adds a couple of Will to compensate for the bigger army size. I have gone to 18 Will in the past but feel as though 16 is the sweet spot for magic and combat potential. However the biggest change is swapping out his horse for a big bad flying beast (sorry to all the fluff and lore fans out there!). The addition of a fell beast achieves two things: firstly,  you now have extra mobility and the opportunity to fly over models to apply pressure where needed and, secondly, you become a huge combat threat which is needed against the other Middle Earth big boys roaming the battlefields at 800pts. Be careful not to pull the trigger too soon with the FB, it is easy to over extend so still treat the Witch King as a scalpel not a hammer. The difference being that the scalpel now has wings and razor sharp teeth. The only other change to his warband is adding a 3rd spectre for more A Fell Light shenanigans. 

Warbands 2 and 3 are identical to the 500pts list with the benefits the same as before. It is in warband 4 where we see an extra Barrow-Wight. As you can tell by my fangirling above, I think Barrow-Wights are superb. A second one gives you 10 Will on the battlefield to try and paralyse opponent's key models as well as further extending your terror battleline. With the WK and two Barrow-Wights, all enemy heroes will be afraid. The warband also adds numbers with more orcs joining the fray. The difference being, at 800pts, the orcs become peerless wielders of blade and axe thanks to our next, controversial hero...

We are bringing a Shade! Shades have drawn the ire of the community for a long time and it took multiple FAQs to make sure they only have a place in one army, pure Angmar. For a hefty investment, you get a model which is about as useful as a chocolate teapot in combat, has an abysmal Courage value of 1, has no Might or Fate and is FV1 with 1 attack. Sounds terrible, right? Wrong! This little beauty was cropping up in evil lists everywhere for one reason, its Chill Aura special rule. For 1 Will point, of which it has 8, the Shade can reduce the duel roll of any enemy model, or friendly model without the Angmar key word following FAQs, by 1 within 6". That is a huge area effect where all of your orcs become essentially FV11 against any other warrior in the game. Even heroes are burning through Might points to beat your lowly orcs in a duel. The Shade allows your 2-handed weapon orcs to fight on a even-footing, or better if they are supported by a spear. It protects your front line of terror causing orcs and heroes, meaning Angmar wins almost any war of attrition. 

Coming in at 50 models, this Angmar list is hard to break down and can sit on objectives comfortably, although it is severely hampered when it has to split up depending on the scenario. In most cases however, you can close on the opponent with a couple of Marches, bunker up around your heroes with a solid, terror-causing orcish wall and outlast your opponent long enough to remove their heroes under an unrelenting hail of magic whilst your Shade just 'chills' in the middle, At that point, let your orcs run rampant and pillage their way to victory.


Now these lists push the magic and terror aspect of Angmar but they can be equally as fun when you build an Angmar monster mash around Gulavhar (probably my favourite model to use in the game!) and Buhrdur or a wraith spam list with the WK, the Tainted and the Dwimmerlaik. I'm confident the above list would help restore Angmar to its former spooky glory. Let me know what you think!

Tournament Report- The Eastern Expansion (20th April)

 Hey all, it's been a little quiet on the blog front for a while as James and I have been working on our Seven Stones army (more to come...