A few weekends ago, I headed up to Sanctuary Games in Sutton-in-Ashfield (just outside of Mansfield, near Nottingham if you’re unfamiliar with the area) for the Battle of Unnumbered Tears GBHL Event, hosted by Owen Wright and GBHL veteran (and former champion) Ed Ball. This is a 100 point event, consisting of 7 games played across two days.
In honour of the upcoming Amazon Prime TV series, players had to select a 797 point good or evil army for the event – 797 being a prime number!
Having played good at several previous events this year, I decided to dust off (quite literally, as it had been sitting on the shelf for ages!) my Haradrim army. With 797 points to play with, I decided to bring in the big guns – a mighty Mumakil!
My full force was taken from The Grand Army of the South Legendary Legion, and consisted of:
Suladan the Serpent Lord, on an armoured horse (my Leader)
7 Serpent Riders
Raza, Fang of the Serpent
12 Haradrim Warriors armed with spears and a banner
War Mumak of Harad, upgraded with a Beastmaster Chieftain, Tusk Weapons, and rappelling lines
11 Haradrim Warriors with bows
797 points on the nose!
My hopes were for Suladan and the Serpent Riders to run around and harass my opponent's forces, the Mumakil to stomp over everything whilst the archers shot anything not trampled, and then for Raza and the spearmen to mop up whatever was left.
As for the Mumak's upgrades, the Beastmaster was a no-brainer. He comes with three might points, giving you the option for a heroic move, plus a courage value of 5, meaning passing the courage tests required when the Mumakil is wounded becomes a lot easier! Tusk weapons are also very useful, as you inflict four Strength 9 hits when trampling instead of three.
Rappelling lines is a little used upgrade, but if used effectively it can be very good indeed – on the roll of a 2+, a model in the howdah can be placed in base contact with the Mumakil and then move as normal. Be careful if you roll a 1 though – your model will then take falling damage, and from the mumak's howdah, you'll take at least FIVE Strength 3 hits. Ouch!
Raza is also a useful character to take – nominate 1 hero in your opponent's army, and if Raza is in base contact with them during the Fight Phase, he gets a +2 bonus to his fight value. With Heroic Strike and Bane of Kings (meaning he re-rolls failed To Wound rolls), he should be able to finish off his target with ease.
As for the Legion, it has some great bonuses – the mumakil (which already causes terror), gains the Harbinger of Evil special rule, meaning all enemy models within 12" suffer a -1 penalty to their courage. The best one, however, gives your leader a free heroic action when they're in combat with your enemies' leader – having those saved might points later in the battle can come in very handy!
With my army selected, I was ready for the 7 games ahead!
DAY ONE, GAME ONE – TO THE DEATH!
My first game of the weekend was against Ben Davies and his Easterling Horde, consisting of Amdur on horse, Khamul the Easterling on a Fell Beast, an Easterling Captain, a number of Black Dragons, 6 Dragon Cult Acolytes, Easterling Warriors and Archers and a couple of Black Dragon kataphracts. Not an easy army to play against – Easterlings have a very high defence, and Amdur is very dangerous in close combat. Add Khamul and his magic, and I was in for a tough game.
Unfortunately for Ben, he'd never played against a Mumakil before, so I explained exactly what it's capable of. He set his army up in a huge shieldwall, intent on stopping the Mumakil before it could move – it's a lot less dangerous if it's not moving.
To the Death! is a very straightforward scenario – charge forward and do as much damage to the enemy as possible. I sent my cavalry on the left flank, not wanting to charge them head-on into a wall of Easterling steel. Raza and the spearmen went up the right flank.
Ben had some early success, winning a heroic move and stopping the Mumakil moving, and then taking two wounds off of it. Fortunately, the Beastmaster passed both courage tests – if he'd failed, Ben would have been moving the Mumak the next turn. My archery was pretty ineffective, bouncing off the Easterling's armour, even with the ability to re-roll 1s thanks to the Poisoned Arrows special rule.
On the left flank, Suladan and the Serpent Riders charged into the Easterling archers, making short work of them. Raza engaged Khamul on the right, but those combats came to a standstill, as Raza won the fights thanks to his special rules, but failed to wound the high defence wraith. Then came the crucial turn – Ben won priority, so I called a Heroic Move – Ben countered, but the roll-off went my way.
The Mumakil promptly moved forwards, and it was devastating. By the time its move came to an end, 18 Easterlings had been trampled by the beast, including Ben's captain and his banner bearer. The Mumakil came to a stop after running into Amdur, inflicting two wounds but crucially not killing him, meaning the Mumakil stopped.
As Khamul and Raza continued to trade blows, my Haradrim mopped up the remaining Easterlings that hadn't been trampled. Amdur bested the Mumakil in combat and inflicted another two wounds – I promptly failed the courage test, meaning it would stampede the next turn. However, I'd inflicted enough casualties that Ben's army has been reduced to below 25% of its starting number, meaning the game was over. My banner bearer was still alive, and my army was unbroken, whilst both of our leaders were unharmed.
Result: 9-0 win! Ben was a great opponent to play against, putting up a great fight against the Mumakil despite never having played against one before – he walked away with my Most Sporting Opponent vote for the weekend. Anyone who can still smile after losing 18 models in a single turn definitely deserves it!
DAY ONE, GAME TWO: ASSASSINATION
My reward for my initial success was a top table clash with the Middle-Earth SBG rules writer Jay Clare. I've met Jay at a many GBHL events and he's a very down to earth person – he loves playing the game as much as he enjoys writing the rules for it – although he did need a few reminders as to my army's special rules, as he's written so many different ones!
Jay was using his trusty Laketown army – Bard the Bowman, Gandalf the Grey, Bilbo Baggins, Percy, Sigrid, Tilda, Alfrid and a horde of Laketown Militia. Assassination is a tricky scenario as you have to nominate an enemy hero to kill (except for the leader, who can’t be targeted), and a model in your army who is the assassin – we both joked about the Mumakil being an assassin – not exactly subtle!
With only two heroes to choose from, Jay had it slightly easier than I did – he chose Raza as his target, and I chose Sigrid. Jay also knew if he came at me head on it would go badly for him – he wisely chose to stay in his deployment area, forcing me to come to him. This also meant I'd have to suffer his archery, which was brutal. Bard's bow, which is Strength 4 and can potentially shoot a maximum of three times in the Shoot Phase, took out the Beastmaster. Gandalf then Commanded the Mumakil into charge range, and in the subsequent combat, the Mumakil was beaten and took several wounds.
With only Courage 3 to pass the test with, I promptly failed. My archery did however take out several militia, along with Alfrid. Annoyingly, I hit Sigrid with several arrows, but even with her low defence and poisoned re-rolls, I didn’t score any wounds. The next turn, Jay stampeded the Mumakil off the board, leaving the rest of his army free to mop up the rest of my Haradrim.
Suladan however, was defiant until the very end – the free heroic action he received for being in combat with the enemy leader allowed me to take a wound off of Bard, but in the end I was overwhelmed by the sheer numbers Jay had at his disposal. He's been using Laketown for several years and knows exactly how the army works – by the end of the game, I had been completely wiped out.
Result: 1-12 defeat. Had I killed Sigrid, it would only have been 6-12, but sadly it wasn't to be. Regardless of the result, it was still a very fun game.
DAY ONE, GAME THREE – COMMAND THE BATTLEFIELD
The opposite scenario to Hold Ground, Command the Battlefield is all about holding the corners of the board, rather than the centre. I was up against Elliot Hamer, who was running the Ugluk's Scouts Legendary Legion.
Command the Battlefield is a Malestrom Scenario with rolls to determine where a warband enters the table. Unfortunately for me, Suladan's warband was the only one to arrive, whereas the majority of Elliot's did – Suladan was alone against Ugluk, Mauhur, Snaga and a host of orcs and Uruk-Hai. By the end of the second turn, nearly all my cavalry had been slain apart from Suladan and two riders. Fortunately, the Mumakil then arrived, trampling a number of orcs and uruks as it moved onto the board. Suladan then took advantage of the legion bonus to declare a free heroic strike, having charged into Ugluk, and promptly cut down the Uruk-hai leader.
Mauhur managed to tie up the Mumak for several turns, but once he'd run out of Might, the Mumakil promptly moved forwards, trampling him, Snaga, and a further half a dozen orcs and uruks. By this point though, Raza had still refused to turn up (I rolled a 1 for his reinforcement roll FOUR turns in a row). The remaining orcs and uruks fled towards the remainder of Elliot's army in one corner of the board, pursued by the Mumakil. Suladan and the surviving cavalry set about clearing up the orcs and uruk-hai left in the other corners.
Raza and his warband finally arrived, and set about clearing the remaining orcs and uruks from the board. The rappelling lines came good in this game, allowing me to drop several archers off in one of the corners and move the mumakil towards the remaining forces. By this point, Elliot's army was broken, and he suffered the misfortune of Grishnakh failing his courage test and fleeing the board. Raza then slew his remaining captain, whilst a well-placed Heroic Move allowed the Mumakil to trample several more orcs.
At this point, the game ended. I held three corners, whilst the fourth was contested. Elliot's leader was slain, whilst Suladan was unwounded and my force was unbroken – another victory for the Haradrim.
Result: 10-0 win. A tricky scenario – but the Mumakil entering the board and trampling models straight away made a big difference – it then won me the game as I was able to run over most of Elliot's army with it.
DAY ONE, GAME FOUR – BREAKTHROUGH
For the final game of Day One, I was up against Callum Fairbrother, who had brought Thorin's Company – Thorin, Balin, Dwalin, Kili, Fili, Oin, Gloin, Bifur, Bofur, Dori, Nori, Ori and Bilbo Baggins. Breakthrough is another tricky scenario – two objectives are placed on the centre line, with another in each deployment zone – the focus of the scenario is taking the objective in your opponent's deployment zone.
This was a tough game that swung in both player's favour. The Haradrim had the early success, calling a heroic move, with the Mumakil trampling Gloin and wounding Fili, and Suladan slaying Bofur. In a surprise twist, Dwalin failed a heroic combat and had to use all his fate to survive. The dwarves then struck back, wounding both the Mumakil, Suladan and killing Suladan's horse. Oin then fell to the Haradrim's archery, but the Dwarves wounded the Mumakil and I failed the courage test. Despite calling a heroic move, Suladan and the banner bearer couldn’t get out of the way and was promptly trampled by the stampeding Mumakil, along with several Haradrim and Serpent Riders.
The Haradrim however, refused to be cowed. Raza charged and killed Balin (helped by his special rules as he was facing his target). Ori fell to the Haradrim's archery, as did Fili. Bilbo however put on the One Ring, and with Dori by his side, headed for one of the centre line objectives, both of which I held, with a few spearmen on each. Thorin kept the Mumakil occupied, charging it multiple times and preventing it from moving.
By this point, the dwarves were broken – Dori subsequently failed his courage test and fled, whilst in another twist, Raza slew Dwalin and Kili in the space of two turns. By this point, Thorin and Bilbo were the only models Callum had left, with Thorin down to one wound and no fate. At 25%, the game came to an end. I held my own objective and one of the centre line objectives – the other two were contested. Suladan was dead, Thorin wounded. The difference was breaking – Callum's army was broken, but I was just one model away…
Result: 4-2 win. A really close game that could have gone either way. Callum had some really bad luck – he didn’t pass a single fate roll in the whole game – Dwalin should also have performed much better than he actually did. Perhaps with a bit more luck, he would have dominated the game a bit more.
By the end of Day One, I had three wins and a single defeat. Day Two looked very promising, although I would be potentially fighting on the top tables.
DAY TWO, GAME FOUR – DIVIDE AND CONQUER
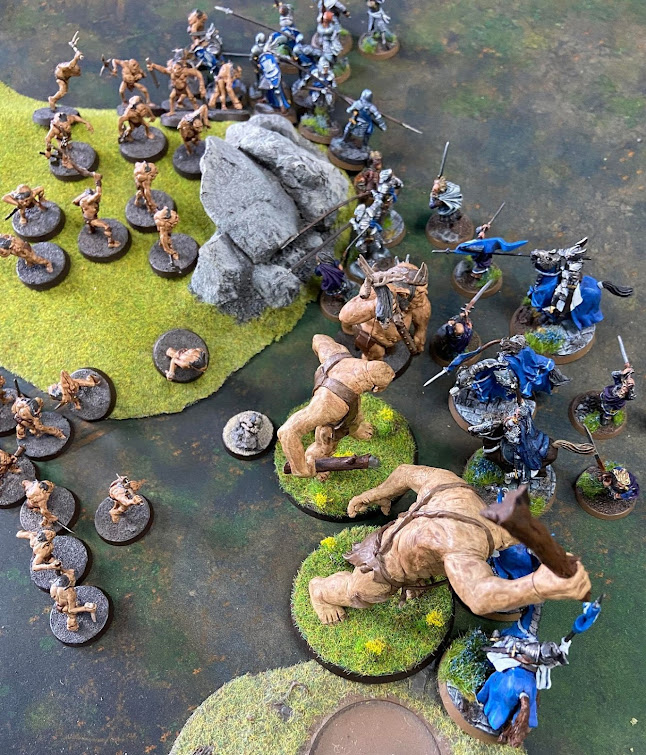
Another difficult scenario, and very tricky opposition. My opponent, Rowan May, brought a very unusual force. A host of wood elves led by Galadriel, including four Wood Elf Sentinels. Allied to that was a Rohan contingent, led by Theodred and Grimbold, including a mounted captain, three mounted Royal Guard and a dozen Helmingas. The way the terrain was positioned also meant that manoeuvring the Mumakil would be difficult – I wouldn’t be able to simply trample all over my opponent's army.
Divide and Conquer makes you split your army into two and deploy them in opposite corners. I deployed my cavalry and infantry in one corner, and the Mumakil in the other. Rowan's cavalry went in one corner, and Galadriel and Grimbold set up in the other with their warriors. I went straight for the central and western objectives, whilst the Mumakil advanced towards the cavalry, shooting as they went.
A well timed immobilise from Galadriel saw my route to the centre cut off, so my cavalry headed towards the elves and Rohirrim, whilst several of my spearmen claimed the western objective. Elven shooting proved deadly, taking out a Serpent Rider whilst unhorsing another. In a disastrous turn of events, Suladan took two wounds from the archery.
Suladan however saw his opportunity the following turn and charged headlong into Galadriel, whilst the Serpent Riders charged into the elves and Helmingas. Theodred and the Guard marched towards the centre, chased by the Mumakil – two Royal Guard fell to the poisoned arrows, as did one of the Sentinels. Suladan then took advantage of the army bonus to call a free heroic strike, winning the fight and knocking over both Galadriel and Grimbold, who had rushed to her aid. Suladan promptly inflicted two wounds on Grimbold, who was saved only by his fate. Galadriel was also forced to spend all her fate points, taking a wound. Suladan charged again the following turn, called another free heroic strike, winning the fight and taking the final wounds of both heroes - Grimbold and Galadriel were both dead!
Unfortunately for the Serpent Lord, he was now surrounded by a host of foes and now only had one might point left. He promptly spent his last might point to call a final Heroic Strike, slaying the second and third sentinels, but was brought down the following turn by Theodred.
By this point, I'd rappelled several archers out of the howdah to claim the eastern objective, and held the central objective, but by now a host of elves and Rohirrim were closing in. The final sentinel was able to drag one of my models away from the eastern objective, whilst the other was cut down by elven archery to hand the objective to Rowan. In the final turn, with the western objective firmly in my hands, the focus was on the central objective. The Mumakil trampled over Theodred and several elves to clear most of Rowan's models, but the captain and the remaining Sentinel still contested it.
In the end, whilst I had more models within 3" of the centre objective, they were all in the Mumak's howdah – and the rule is the 3" around the objective only extends 3" up – they were too far away! With both armies broken, and both leaders slain, Rowan held the central objective and took the victory.
Result: 5-8 defeat. A tough one to take when you lose the game on a technicality – even my opponent admitted it was harsh. But at the same time, you have to follow the rules. I could have won the game if I'd rappelled my models out of the howdah and crowded the objective, but I didn’t. An important lesson learned!
DAY TWO, GAME 6 – DESTROY THE SUPPLIES
Another fun scenario, but a very difficult opponent – GBHL veteran and League Winner, the appropriately named Will Champion! Will had brought a very compact but powerful force – Treebeard (with Merry and Pippin), Quickbeam, Beechbone, Gandalf the White on Shadowfax, Damrod and a Minas Tirith banner bearer.
Fortunately, I had manoeuvrability on my side. I left a few Haradrim behind to guard my supplies and headed forwards, shooting Will's banner as I did. Unfortunately, Gandalf controlled the Mumakil more than I did, Commanding it both into a building and into combat, where it was pulverised by the Ents. Fortunately, several of the crew survived the fall, including the Beastmaster, who survived five Strength 3 hits!
With the Mumakil gone, the Ents turned their attention towards the rest of my forces. Beechbone, Merry and Pippin were left to deal with the surviving crew, whilst Treebeard and Gandalf headed towards the rest of my force. Luck however was on my side – Quickbeam bested but failed to kill a Serpent rider I had perched on the first supply marker. The following turn, Suladan called a heroic move and charged Quickbeam with several Serpent Riders, ensuring that supply marker would be destroyed. My Beastmaster also raced to the third supply marker, whilst the other surviving crew engaged Beechbone and the Hobbits.
I then had my second piece of luck – Beechbone won his fight and barged the Haradrim out of the way – a 2+ would have meant him charging my Beastmaster, but Will only rolled a 1! Another supply marker destroyed! Merry then fell to the other crewman, whilst the Ents and Gandalf made a mess of my forces, slaying Suladan, Raza and my banner. Damrod however was not so lucky and was brought down. A loan Serpent Rider then made for the final supply marker, cutting down Pippin in the process. However, by this point I was below 25%. Will had broken me and killed my leader, but I'd destroyed two supply markers – the game was a draw!
Result: 4-4 draw.
DAY TWO, GAME SEVEN – LORDS OF BATTLE
The final game of the weekend was a rematch against Will. Unfortunately, this did not go well for me at all. Lords of Battle was the one scenario Will had wanted all weekend, and he got it. The Ents proceeded to annihilate my cavalry, and then my infantry in very short order. Gandalf Sorcerous Blasted the Beastmaster off the Mumakil, which the Ents promptly turned their attention to. The saving grace was the game ended before the Mumakil could be killed – it only had two wounds left.
The whole game lasted just under half an hour, and I only managed to score 4 wounds, these being Damrod's wound and fate point, and one wound and one fate on Quickbeam. By contrast, Will scored 38 wounds…
Result: 0-12 defeat. A 30 minute 12-0 thrashing was definitely not the best way to end the weekend. However, Will was very gracious in victory, admitting any other scenario would have produced a different result.
SUMMARY
I finished the weekend with three wins, three defeats and a draw, finishing 27th out of 50 players. Not a bad return, considering the Mumakil is a very big points investment in the army, but it performed excellently – particularly in Games 1, 3 and 5, where it's presence made a big difference – the fact it has Harbinger of Evil in the Legendary Legion makes it much harder to be charged. The tusk weapons also made a difference – an extra Strength 9 hit can help inflict that extra wound to finish off a hero that otherwise would have stopped it moving.
Suladan was excellent – his banner helps troops around him and the ability to call a free heroic action thanks to the Legion Bonus was a big difference – he slew Ugluk, Bifur, Galadriel and Grimbold over the course of the weekend, and was able to wound Bard the Bowman. He even went toe to toe (or rather twig) with Treebeard for a few turns in Games 6 and 7. A seriously underrated hero in my opinion!
Raza also proved useful – his special rules came in very handy for killing off heroes, especially in Game 4 – slaying Dwalin, Balin and Kili in a single game is a pretty good achievement. He struggled in Game 5, and was outmatched against the Ents, but if you pick the right hero to target, he can really come good – he even went up against Khamul in Game 1 – if it wasn't for the Ringwraith's natural toughness, I may have claimed a bigger victory.
The event itself was excellent – very well organised, a fun mix of games and a nice variety of opposition – Easterlings, Laketown, Uruk-Hai and Orcs, Elves, Rohirrim, Dwarves and Ents. The venue was great too – well lit, not too hot or cold, plus a nice selection of drinks and donuts available too – what more could a Strategy Battle Gamer want?
Hope you've enjoyed this write-up – keep an eye out for more in the future!
Until then, Happy Wargaming!
TheTolkienNerd