Tuesday 21 December 2021

Tournaments Report- Battle Games in Middle Earth (4/5th Dec 2021)

 The Tournament

This is one of my favourite events of the year. At the heart of the hobby in Warhammer world itself, 1000pts of very theme heavy joy, everyone getting into the spirit and a very sporting atmosphere. The effort people put into their armies and the unique ones you see just gives you a warm feeling.

This time, is a slightly different approach to the report, as I'll be writing up alongside fellow EAHC member James, who also attended.


Our armies

James

Minas Tirith

King Elessar

18x Warriors of Minas Tirith w/ 9x Shield and 9x Spear/Shield


The Fiefdoms

Prince Imrahil

12x Swan Knights of Dol Amroth


Rohan

Eomer w/ Shield

13x Warriors of Rohan w/ 1x Banner, 4x Shield, 4x Throwing spear/Shield and 4x Bow


The Rangers

4x Rangers of the North w/ 1x Spear

50 models


Sam

The Fellowship

Gandalf the Grey w/ Horse

Aragorn w/ Anduril and Armour

Legolas w/ Armour

Gimli

Boromir w/ Shield

Frodo w/ Sting and Mithril Coat

Sam 

Merry

Pippin


Rivendell

Glorfindel w/ Armour of Gondolin and Asfaloth

10 models

The reasons for this army were simple.

1. I had the three hunters, who were just begging to be painted. And had been for over two years now.

2. I had always wanted to make a mounted Glorfindel.

3. Lots of might is fun


Game 1- Destroy the Supplies

As luck would have it, in the very first game of the weekend. We were drawn as opponents. We had played a practice game the night before, with very limited time and I had played recklessly in order to get the game played to a near conclusion. I had been beaten 7-0 but had got more familiar with the nuances of the list.

James: The odds were stacked very highly in my favour here, as i had fifty models to Sam's ten.

The game began with James deploying Eomer to my left along with two rangers, Aragorn in the centre and Imrahil to my right with the other two rangers. I deployed my Heroes in the middle behind a house with Legolas peeking out and Glorfindel ready to run down the right objective. Strider, I left on my left to attempt a defence of the left objective. James, not having much to fear of a counter attack, went for a full assault, charging forward.

Gandalf cast a channelled blinding light to protect the Fellowship from the arrows and Legolas opened fire, managing to take a fate off of Eomer. The next turn, Gandalf blasted two Rohirrim and Legolas sniped out James' banner, removing his 2VP headstart. He continued to pick off Rohirrim until the Men of the West hit them.

James: Sam was able to hold me up considerably with his forces in the centre, until my heroes started to enter the combats- I was able to surround him with warriors and then use my heroes for Heroic Strikes.

Boromir went out and faced Eomer, while Gimli charged two Rohirrim. Boromir managed to win but failed to wound Eomer as Gimli lost his fight. Legolas moved to the opposite side of the house and fired at the two rangers to the right, taking a fate from one. Glorfindel, seeing that Imrahil was too close to the right objective, ran and stood on it. Imrahil, naturally, charged him in response. Over a few turns, the elf first killed several knights before his horse took a beating but Glorfindel used his fate to protect it.

Meanwhile, Strider joined the fray, abandoning the left objective, as Elessar charged and slew Gimli with Anduril. Gandalf held back Eomer, but was quickly slain in response, while Pippin fell to some Gondorians.

Legolas had continued to snipe the rangers, killing one but ended up being charged, turn after turn until some knights charged him. He managed to win several fights and killed 3/4 before finally losing and taking 2 wounds. He, obviously, then failed all three fate and succumbed. Glorfindel continued to hold off and killed the second ranger along with more knights.

In the centre, Strider was charged and fell to Elessar and he was overwhelmed. Sam too fell as Boromir was charged again by Eomer and felled. With only brave, brave Merry left in the centre, it wasn't long before Elessar's gentle nature took a darker turn...

By the end of the game, James had slain my leader, taken all three objectives and broken me.

Result: 9-0 Victory to James

James: A very valiant effort from Sam, but unfortunately luck was, as usual, not on his side.


Game 2- Assassination

James (vs. Josh(Easterlings/Khand))

I've met and chatted with Josh at multiple GBHL events, but never had the chance to play him until now. His Easterling and Khand force had some particularly nasty units- Khamul, Amdur, several chariots and multiple Dragon Cult Acolytes.

Choosing a target is also difficult, so I chose one of his mounted chieftains and chose Imrahil as my assassin. Unfortunately for me, Josh chose Khamul as his assassin and had four Rangers to pick as his targets- much easier to take down than Imrahil or Eomer!

The majority of his army ended up on the left flank, where I'd placed Imrahil and his knights. Aragorn and the men of Minas Tirith held the centre in a shield wall, whilst Eomer and the Rohirrim were dealing with a few sacrificial Khandish horsemen on the right flank.

Things did not go well for the Swan Knights- they were either trampled under the wheels of the Khandish chariots or skewered by the throwing daggers of the Acolytes. Imrahil, however, held his own, slaying several Easterlings and Khandish horsemen, before ultimately being surrounded and brought down by Amdur and the Easterlings. Equally unfortunately, for me, Khamul compelled his target Ranger away from my lines and subsequently tore him apart in combat. Khamul also spent the game bombarding Aragorn with magic, draining his will and then his courage almost every turn.

Things didn't all go Josh's way however- Aragorn and Eomer combined well to take down several Khandish warriors and Acolytes, including the Khandish King who'd been causing michief for the men of Dol Amroth. The men of Rohan and the surviving Rangers also acquitted themselves well, combining to take out several chariots and horsement. The battle was evenly poised heading into the final few turns, but then the momentum swung in Josh's favour- he won several Heroic move roll-offs, allowing him to dictate any charges, preventing Aragorn and Eomer from getting in amongst his warriors.

Things then went worse for me as my army broke and Aragorn fled, his courage severely reduced, thanks to Khamul's magic. Amdur then charged into and cut down Eomer. Despite only a being a few models short of breaking Josh's army, I then failed to kill anything for the remainder of the game, despite winning a string of combats. My army, however, continued to crumble until the last of my warriors fell, wiping me out.

A small consolidation was the fact that I had caused a wound on the chieftain that was my target. Josh, however, had killed his target with his assassin, killed my leader and broken me without being broken. We both agreed though that the game had been closer than the score suggested.

Result: 12-1 Defeat


Sam (vs. Martin(Numenor/Rivendell))

Opponents heroes: Elendil, Gil Galad, Cirdan and a Rivendell Captain

Opponents warriors: Kingsguard, High elf warriors and Numenorian warriors

Looking at Martin's army and the frightening amount of F6+ models, I thought I'd hit hard and fast. I chose the Captain as my target, as I wasn't too confident on taking down Gil Galad and didn't know if I'd get to Cirdan. I chose Legolas for my assassin, as I figured that he'd have the easiest time finishing off the target with his bow from the back.

As we started, I rushed forward, leaving the Hobbits at the rear with Legolas. Seeing the captain not far from Glorfindel, I thought I'd go for an early advantage. Gandalf blasted an elf into Elendil, dismounting him and Glorfindel charged a Numenorian and called a Heroic Combat. Hitting the captain and dismounting him too. Gandalf then blasted the captain into a wall, causing a wound and Elendil trapped Glorfindel with some warriors. Glorfindel lost the roll off after they drew and was slain the next turn.

Legolas, meanwhile, sniped out Gil Galad's horse and picked off various useful targets, not wanting to spam shots at the captain and give away my intentions. Boromir was charged by Gil Galad and called a Heroic Defence while surrounded by him and several elves. He survived and the next turn killed three elves in a single combat. Gil Galad then returned and this time finished off the man of Gondor.

As this was happening, several Kingsguard had flanked around and charged into the Hobbits in their field. Legolas pulled away and fired a shot that killed an elf on Aragorn and also removed the spear support with them.

Gimli held at the front for a long while before Aragorn fell to the united might of the two Kings. The Dwarf managed to slay three Kingsguard before falling in the same way to Strider.

Sam, Merry and Pippin all hold in the field, allowing Legolas to look after Legolas and flee out the back, still firing direct hits onto the elusive captain. With all pretense gone, I was simply after a lucky 6 to wound and hoped for a failed fate.

Frodo, the last Hobbit, put the Ring on and slipped into the gateway. Legolas fired his last shot and still didn't manage to score the wound.

Martin had slain his target (Boromir) with his assassin (Gil Galad), broken me and slain my leader. I had wounded my target.

Result: 12-1 Defeat


Game 3- Hold Ground

James (vs. Jay(Thranduil's Halls/Survivors of Lake-town/Radagast's Alliance/Erebor Reclaimed))

Opponents heroes: Thranduil, Bard, Bilbo, Gandalf the Grey, Beorn, Thorin, King Under the Mountain and Dwalin, COE

Hold ground with a fifty model force against ten heroes? Sounds easy, right? Well this was definitely not easy! Jay's army packed some of the most powerful heroes of the Hobbit films, including Beorn, Dwalin, Thorin and Thranduil. 

However, the maelstrom deployment went heavily in my favour- his army ended up scattered around the battlefield, and I was able to hold up Thorin, Bard, Thranduil and Thorin using my Rangers, whilst the men of Gondor and Rohan marched to the centre and set up a shieldwall. Beorn, however, appeared right behind my Knights of Dol Amroth, and proceeded to rampage his way through them. They did however, make it to the centre, and Imrahil proceeded to tie up Beorn in several combats, allowing Aragorn to close in on him. Only a heroic move roll-off saved Beorn from being taken out by two heroes.

Elsewhere, Thorin and Dwalin continued to cut through the men of Rohan, whilst Gandalf repeatedly (although not always successfully) threw sorcerous blasts at my battleline- eventually taking out my banner bearer. Thranduil also arrived in the centre and immediately made it difficult for me to make ant charges, thanks to his free aura of dismay from his circlet. My forces were no broken, and I couldn't seem to get my heroes into Jay's heroes. Fortunately, the game ended on the very first roll- I had more than double his numbers in the centre.

Result: 5-3 Victory


Sam (vs. Ben(Variags of Khand))

Seeing such a vast horde of cavalry and chariots, I knew this was going to be a tough one. I had the luck of a maelstrom deployment, and so, potentially knew his army could divide.

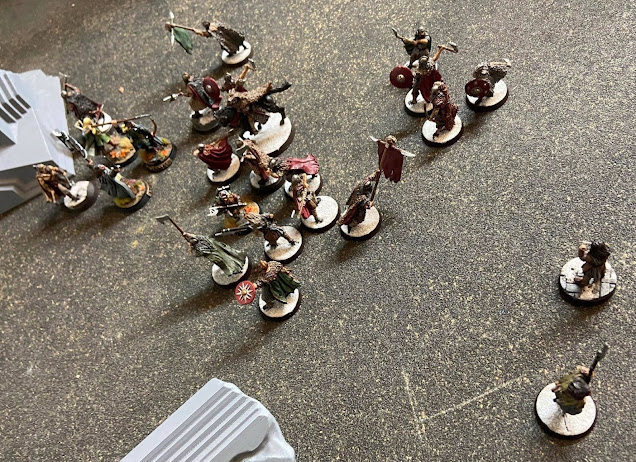
And I did get lucky, as the Fellowship arrived as close to the objective as can be (due to the 6x4 boards), although Glorfindel failed to arrive, while Ben's army was split almost down the middle, arriving at opposite ends of the board, with a small chieftain's warband arriving near to me. Gandalf had cast a single dice blinding light as he arrived, protecting the Heroes from their bows.

The next turn, he cast a channelled one as Strider called Heroic March alongside Boromir's Heroic Move. They quickly moved up to the centre with two turns of this as Legolas failed to hit a barn door. Glorfindel arrived up to the North (left side of pic) and quickly galloped past the Khandish.

As the Fellowship closed in on the central woods, Gandalf commanded a chariot to slam into the rear of his King, causing a wound to the chariot. The King's chariot then strayed slightly too far. Legolas, Gandalf and the Hobbits moved into the woods as Aragorn, Gimli and Boromir ran within charge range of the chariot. They then won the Heroic move off and charged it. Glorfindel linked up and charged two horsemen, before getting the surprise of his life, when another chariot plowed through them both into him, forcing him to spend fate for his horse. Some other horsemen then charged Boromir and Gimli. Boromir called a Heroic combat and then rejoined Aragorn, allowing them to slay the King.

With that side of Ben's army severely weakened, the Fellowship moved back towards the woods, ready for the second attack as multiple chariots closed in. In a swirl of melee, many Khandish were cut down but the Fellowship was exhausting their might trying to avoid being knocked down.

In the thick of it Samwise, sees Frodo under attack and calls a free Heroic combat against the chariot he charged. Classic Samwise the Brave, he manages to slay the driver with a might point and rush towards Frodo.

The next turn, Frodo is charged by the leading King and Samwise is held down by two horsemen. The only person, who can help, is Boromir. He slays the chariot before him and charges the King, but misjudges and finds himself under its wheels. He falls, Samwise with him.

Merry and Pippin, meanwhile, show the potential of Hobbits as they both wound a chariot each. The following turn Frodo does the same. Legolas and Gandalf end up fighting a chieftain, as Gandalf's horse is killed by the charge, they lose and Gandalf goes through all his fate, only passing on the last reroll. Once Aragorn joins, they finally slay the Chief. Gandalf then prepares to line up a sorcerous blast to knock a charioteer into the King and using his free point and his last will, rolls snake eyes...

The game continues too long for Ben after the Khandish break and several flee as Aragorn keeps calling free Heroic moves, when needed, pinning down the heroes. Gandalf loses a fight and takes a wound, but it's too little too late and the centre is taken with only 3 Khandish left after the King is finally slain.

By the end, this was the Khandish dead pile...

I had slain Ben's leader, broken his army and held the centre with triple the number of his warriors. He had wounded Gandalf.

Result: 12-1 Victory


Game 4- Divide and Conquer

James (vs. Damian(Ents))


Another player I've often met and chatted with at GBHL events, but never played with.

Damian is one of the busiest and best content creators for the Middle Earth Strategy Battle Game- one half of the team behind the SBG magazine, one of the Battle Streams in Middle Earth team and running of the excellent themed GBHL event, Seven Stones, a doubles event full of fun and fluff.

Over the last few years Damian has been showing up at Warhammer World events with superbly painted armies, complete with unbelievably detailed display boards and matching fancy dress to boot- his commitment however has been justly rewarded, winning the last two Throne of Skulls events.

For this battle, I'd be facing Treebeard, Quickbeam, Beechbone and four Ents- not an easy force to play against. Fortunately, I was able to use Aragorn's free might to call marches each turn, allowing me to reach the middle faster. A huge surprise early in the game, occurred when I took out one of the Ents with shooting, my Rangers taking two wounds off it initially (before he then picked up and bashed their heads together, taking them out of the game), allowing my Rohirrim archer to pick him off. TIMBER!

In the centre however, fortune was not on my side- I accidentally left Aragorn exposed, allowing Beechbone to barge through combat into him, taking off a wound and all his fate. Aragorn counter-charged the next turn, but disasterously fluffed his Heroic Strike roll, allowing Beechbone to finish off the King of Gondor.

That left Eomer and Imrahil to try and take down Ents, and unfortunately they weren't up to the task. I did, however, manage to reduce two of the Ents to one wound apiece, but they stubbornly refused to take their final wounds. The game went right down to the final turn, turning into a huge tactical challenge for both of us, as Damian tried to keep me off of the objectives, and I attempted to surround the Ents and get some crucial traps in combat, which would give me a better chance of scoring a wound (or hopefully more).

Treebeard, however, had other ideas- he didn't lose a single combat. Damian also made excellent use of his brutal powers, barging my models away from the objectives, rather than opting for hurls, or rending. Sometimes, he did rely on the brute force of the Ents, which was equally good. My army continued to crumble, but fortunately one of my Rohirrim held on to contest and so deny Damian the left objective, whilst he held the objectives in the centre and the right hand side.

By the end of the game, we were both delighted with how good and close the game had been (despite the score)- we both agreed that it had been one of the best games in SBG both of us had played in years- it seemed rather fitting, given that we'd wanted to play each other for ages.

Result: 11-0 Defeat


Sam (vs. James C.(Isengard))

I knew that this would be a tough one, with so many enemy troops and a wizard to manage, I decided to just rush for the centre, turn against Saruman and then try to push back the rest once he was dealt with.

My first move was to command Grima away from the Fellowship, then repeat the next two turns and march with Aragorn to put good distance between us. I reached the centre quickly and turned to face Saruman's incoming army. First, the Fellowship was hit by a flock of birds. Using some Heroic Combats, they quickly killed these off and then took the impact of the Dunlending cavalry, which they also managed to slay, although Boromir had to burn some might after bad rolling. 

Legolas began picking off loose Wildmen and Dunlending archers. Glorfindel linked up just as the Fellowship charged towards the Wildmen. Gandalf blasted the banner into one, killing the banner bearer and knocking the wildman prone. 

Glorfindel then charged said wildman and heroic combatted into Saruman! Naturally, he then lost the fight and a golden opportunity to take down the wizard quickly slipped away. The Oathmaker called a Heroic Move and won the roll off, allowing the wizard to make a run for it. At the same time, Thrydan had bravely charged Aragorn. Sam and Gimli then charged in to counter it but despite Gimli's Heroic Strike, then lost the fight and found Samwise cleaved in two! With Gandalf, the man and Dwarf avenged their fallen Hobbit, before charging into the Wildmen to assist Glorfindel, who had rolled poorly and ended up on 1w, 0f!

Aragorn and Glorfindel fought against the Wildmen, with the former slaying the Oathmaker, as the surviving Fellowship members turned to face the advancing Dunlending main force. Boromir charged the flank and as he prepared for a Heroic Combat, a very unwelcome ex-man of Rohan returned. Boromir called it anyway, seeing a chance to be rid of Frida, he ended up using his last two might to win the fight (being on two wounds and not liking the chances). Then, promptly failed to wound either man he faced...

The next turn, he faced Frida and failed to get through her Heroic Defence, before being cut down the following turn by her men.

Gimli took a surprise Sorcerous blast from Saruman and suddenly was attacked by Gorulf, before Aragorn leapt in and saved him.

 As time was called, in the final turn, Merry fell in the fighting and Gorulf used his final might to slay Gimli. The rest of the Fellowship caused a few more casualties but sadly, not enough.

James had taken both of the flanking objectives and held the contested central one, while I had broken him.

Ahem...Glorfindel, a word please 😂

Result: 7-1 Defeat


Game 5- Lords of Battle

James (vs. Sam McG(Rise of the Necromancer LL))

Opponents heroes: The Necromancer, the Witch King, Khamul the Easterling, the Dark Headsman, the Forsaken, the Lingering Shadow, 2x Abyssal Knights, 2x Slayers of Men and the Keeper of the Dungeons

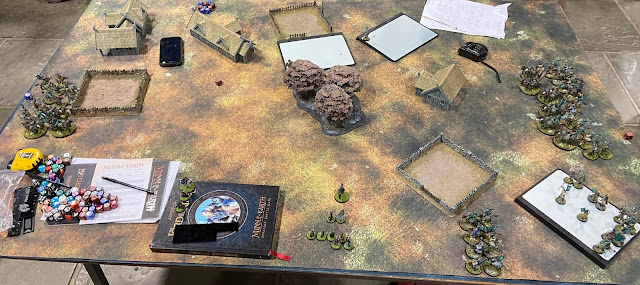
My final game for the weekend (and the year) saw the Men of the West up against the Rise of the Necromancer Legendary Legion- this game was not going to be easy. We set up everything in the centre, and prepared for the inevitable slug-fest that is Lords of Battle.

I had some surprising early success- my Rohirrim 'killed' several Nazgul with a combination of archery and the Throwing Spears- handing me four wounds in the first turn. The downside of Nazgul of Dol Guldor, of course, is that they are very hard to kill permanently- over the course of the game, I 'killed' them multiple times, only for them to come back the very next turn. The Nazgul then proceeded to cut their way through my forces, including Eomer, who fell to the Keeper of the Dungeons, and Imrahil, who had his wounds drained away by the Necromancer's Chill Soul magical powers.

Aragorn, however, had other ideas as he cut down Nazgul left, right and centre- his elven blade making it harder for the Nazgul to pass their resurrection rolls- two of them subsequently failed and so would not be coming back. 

Then came the crucial moment. The Necromancer had been bombarding me with magic all game, and was equally dangerous in combat, thanks to the extra attack he gets from the Legendary Legion bonus. However, being low on will points, Sam elected to charge him into Aragorn. Aragorn then won the fight and did two wounds- it cost the Necromancer four will to save the wounds, but he had then lost his remaining will point for being in combat! As his ancestor had done many years before, his heir had vanquished the Dark Lord!

With the Necromancer gone, Aragorn went on the rampage, cutting down the Keeper of the Dungeons, and then using a free heroic combat in the next turn to kill two more Nazgul, who promptly failed their resurrection rolls.

At this point, Sam's force was broken, and again the game ended on the first roll to see if it continued. Sam had racked up a considerable kill tally- with 30 odd wounds to my 14 (so more than double mine), thanks to all the fate points spent by Aragorn, Imrahil, Eomer and the Rangers, but with his leader dead and my force unbroken, I had managed the draw!

Result: 5-5 Draw


Sam (vs. James H.(Thorin's Company))

For my final game, we were given Lords of Battle, I was pretty happy with that. But when I saw it was against Thorin's Company, it didn't seem quite so clear cut.

We deployed right in front of each other, Legolas started on a balcony, preparing to harass the dwarves from above. Glorfindel, to the far right, ready to charge in and hit hard.

The Fellowship surged forward, Aragorn took on Dwalin, Boromir- Fili and Nori, Gimli stood beside Aragorn and Gandalf compelled Gloin forward to block Bilbo from interfering. Frodo, Sam and Pippin surrounded Bofur and Glorfindel charged Bifur. In response, Dori charged Gimli while Oin and Kili joined against Glorfindel. Legolas fired his bow and failed to wound, while Ori, used his slingshot and caused a wound on the elf.

Heroic Strikes were called by Aragorn, Dwalin, Boromir, Fili, Nori and Kili. Bombur also called a Heroic Defence.

The Hobbits went first and managed to slay Bofur, Sam regaining the might he spent to cause the third wound. Boromir won and killed Nori, Aragorn managed to wound Dwalin and, while Kili defeated Glorfindel, the dwarves failed to get past the elf's Horse Lord fate rolls. James had had a horrifically unlucky turn. One small bit of solace was that Dori had managed to wound Gimli.

The next turn, the Fellowship won the move off and Gandalf sorcerous blasted Gloin into Bilbo, who was wearing the Ring. The Hobbit took a wound and the rest of the Fellowship engaged as Gandalf charged into Dori. Samwise charged Balin, allowing Pippin to finally go and stand up to 'evil' Gandalf.

Gloin and Bilbo, now enraged got up and charged the former's son, pulling him off of Dori. And Thorin joined the combat against Gandalf. Legolas managed to shoot a wound onto Ori.

In the combat's that followed, Glorfindel slew Oin, Aragorn killed Dwalin, Boromir sliced through Bombur and Pippin, amazingly, beat back Gandalf and Ori slaying the dwarf! Gimli defeated his dad and landed a blow on the Hobbit.

Balin managed to get a wound on Samwise in return for all the violence and Thorin took some of Gandalf's fate.

James' luck was really not with him as, in the turns following this, yet more of the company fell.

Legolas shoots Bifur, Glorfindel- Kili, Boromir- Fili, Sam and Frodo- Balin, Gimli- Dori. 

The Company's Gandalf did manage to give some injury back as he killed Samwise the Brave, but that just caused the Hobbits to gang up on him.

Things just got worse as now with superior numbers, the Fellowship quickly killed Thorin, Bilbo and Gloin.

With just the Company's Gandalf left, the Fellowship one ran over, dismounted and had a slapping match until the game ended.

James had had the absolute worst luck in this game, only passing 1-2 fate rolls out of the 15-20 he did, so the score didn't feel very fair on him.

Result: 12-0 Victory


James: With the event over, I'd come away with two wins, two defeats and a draw- not a bad weekend in all, and some very fun games to boot. I'm looking forward to painting up some new armies over Christmas and taking them to GBHL events next year- roll on 2022!

I personally had managed two wins and three losses, but taking all hero, I did expect some uphill struggles and had a great time with them. It was a great weekend of games and a great feeling to finally be back to the big tournaments at WHW, we greatly look forward to the Grand Tournament in February! 


Upcoming Tournaments that I'll attend

8th Jan- A Rumble in Rhovanion- 400pts


16th Jan- Return to Rivenstead- Escalation 350/650pts


26/27th Feb- Grand Tournament- 700pts Good/Evil

Thursday 2 December 2021

Tournament Report- Wrath of the Nine (28th Nov 2021)

 The Tournament

This was a local one day tournament at 4tk in Colchester. A nice, straightforward tournament with 650pt armies, pools 1-4 only and 22 players as well as a nice mix of scenery and boards. This was particularly personal as it was also the scene of my only tournament win!  (About 3yrs previously)

Could I repeat history?


My Army

Army of Dunland LL


Thrydan Wolfsbane w/ Horse

Crebain

Dunlending Warriors x11 w/ 1 Banner, 2 Shield, 4 2h and 4 Bow


Gorulf Ironskin

Crebain

Huscarls x2

Dunlending Warriors x5 w/ 1 Banner, 2 Shield and 2 2h


The Wildman Oathmaker

Wildmen of Dunland x12 w/ 6 2h


Dunlending Chieftain w/ Axe and Shield

Crebain

Huscarl x1

Dunlending Warriors x5 w/ 3 Shield and 2 2h


43 models

One day, I shall remember to get a team photo for the write up...but it is not this day!


I chose this force as I spent a lot of time early last year painting this army, only to get a small handful of run outs for them prior to lockdown. Having not used them in a while, this seemed ideal.


Game 1- Destroy the Supplies (Vs. Darren (Army of Thror/Dale))

Opponent's Heroes- Thror, Girion and Erebor Captain

Opponent's Warriors- Guardians of the King, Grim Hammer, Erebor warriors and Dale Warriors


Immediately, I knew I was in trouble for this matchup. Darren had several high strength bows, then throwing weapons and a high defence frontline to follow up. I decided that I'd simply have to go very aggressive and get into fights as soon as possible, hoping my Crebain could swoop in and destroy the supplies to force the good side to try to counter attack.

Things started badly for me as I lost several warriors to the Dale bows and then even more to the throwing axes. Thrydan charged and heroic combatted to kill several Guardians of the King but found his unit quickly dying off.

The Oathmaker ran down the centre and lost half his warriors to the bows and Girion but surprised everyone as he with his unit, fought back hard against the Captain's unit, holding the fight very level in numbers. 

Gorulf took several shots, despite putting up several 'in the ways' and found himself quickly on 1w, 0f and 1m. A unit of Dale warriors tried to rush past but he threw himself with his unit into them, killing several but losing more troops and their banner to bowfire and combat. One slipped past and ran for a supply.

The Dunnish Chief called a Heroic Move, the intention being to simply force Thror to counter and waste a might, Thror won the roll off and I prepared to fly my Crebain to two markers...except I had forgotten one small risk, as my Chieftain failed his courage and fled...Hmmm

The birds were grabbed by angry dwarves in response.

Thror faced Thrydan, who used his last might to try and do some damage through a Heroic Strike, hoping to roll a lucky double 6 to wound and maybe one shot the King or at least wound him. But alas, Thror's Strike went higher and despite rolling a 5 to win, Thrydan only managed a 3 highest. He was slain. 

Darren started charging my warriors, seeing that I was a single model from ending the game, intending on simply shielding to prolong and maximise VPs, but didn't think as his Dale warriors pulled away from Gorulf...and his Dunlending. I took the Dunlending's courage first and he fled, ending the game and saving me a severe thrashing.

The game ended in a 6-0 defeat as Darren had destroyed a supply, broken me and slain Thrydan.


Game 2- Hold Ground (Vs. James (Grey Company))

Opponent's Heroes- Aragorn, Legolas, Gimli, Halbarad and Rangers of the North

This was as ideal a matchup as I could've dared hope for, with my relatively large numbers against 9 men in an objective scenario. My intention was to simply fly for the centre, sit on it and hold the enemy as far back as I could, either killing him before he got close, or dying and ending the game while holding it.

I arrived on the Southern and Eastern board edges, while Aragorn led his rangers in from the North. I called Heroic March with the Chief and flooded the centre as fast as I could as James peppered me with arrows. Now that the centre was secure, I sent all but 3 of my men towards the Grey Company (leaving the Oathmaker as he's fearless and wouldn't abandon his post). I flew all my Crebain into two of the Rangers, hoping for a lucky early kill but lost the fights and they were killed the next turn. However, this had saved me a couple of turns of some shooting and allowed me to close the gap.

I hit them hard, Gorulf charging two Rangers with a Huscarl support and calling a free Defence for insurance. He quickly cut them both down. Aragorn and Gimli fought back killing a few Dunlendigs but I soon had Gorulf holding down Legolas as the Dunlendings attempted to overwhelm. Thrydan was carefully skirting around towards the back, waiting for his chance.

Aragorn, rolled poorly for a couple of fights as I had stabbed and forced James to spend might to avoid taking wounds. It was as he was on 1m and had already used his free point that Thrydan struck. The Dunlendings parted and their leader charged down the middle into Aragorn, calling a Heroic Strike, Aragorn countered but didn't roll well again and suddenly ended up taking 8 wounds in total from the 'Mighty Blow'. 

Legolas and Gimli fought ever harder to avenge their fallen friend and suddenly Thrydan ended up surrounded by them and the remaining rangers. The Dunlending's attempted to peel them off but Legolas outfought them and almost slew the leader. The game ended just after.

I scored a 10-2 win as I had sole control of the centre, had slain Aragorn, while Thrydan was wounded and we had broken each other.


Game 3- Lords of Battle (Vs. Ryan (Isengard))

Opponent's Heroes- Saruman, Lurtz and Ugluk

Opponent's Warriors- Berserkers and Uruk Hai

As Lords of Battle was announced, I groaned. This was a scenario I was concerned for with my low defence and up against Isengard. This could be tough.

I lined up and Ryan deployed 8-10" away. I moved up as fast as I could go and took a few casualties to the shooting. The next turn, I charged in with Gorulf and the Chief as Thrydan hung back, wary of Saruman. I flew my Crebain over the top to pin down the pikes and reduce the Uruks' movement options. They were both surrounded and died but had given me a chance by the end of the turn.

A string of Heroic Combats were called and Ugluk had won the roll off and charged into the Oathmaker. Gorulf found himself up against Lurtz and so confidently called his free Defence in response to the Uruk's Heroic Combat, Lurtz laughed at this and rolled a couple of 6s to wound...I rolled a 1 for fate and having spent a might for a Heroic Move earlier...lost one of my killiest heroes. It was a bad start. However, I had also called a Heroic Combat with my Chief, with the intention of using it to chop through another rank, but Ugluk had opened himself up and so the Chief redirected and instead joined the Oathmaker. Ugluk rolled a 3 highest and ended up taking 3 wounds from the two heroes, I had lost Gorulf, but taken Ugluk.

With the far reaching Dunnish Banners, I was getting a good foothold into the Isengard lines, coupled with a few flanking warriors, we were turning it around. However, there was still a wizard to manage... I lost priority and called a couple of Heroic Moves charging the Oathmaker and Chief into a lone Uruk. Then with Thrydan's, my last Crebain then blocked Saruman's Uruks and a Wildman, who had an opening, pinned the wizard!

Thinking I had no better chance today, I called a Heroic Combat with the Chief and Heroic Strength with the Oathmaker (getting up to 7, needing 3s to wound Saruman!) We easily beat the Uruk and then...

FAILED TO WOUND! (4s with the Chief in black (Piercing Strike) and same for the Oathmaker (1 might)

Unbelievably, the white wizard had escaped the perfect trap that turn. The next turn, the Oathmaker and a crowd of Dunlendings broke through and caused 5 wounds on Saruman, who then managed to pass all 3 fate! The following turn, he fought back and clubbed the Oathmaker to death with his staff.

Thrydan had spent several turns after charging, being immobilised by Saruman but somehow managing to fight off Lurtz and his Uruks. Once the wizard was pinned, Thrydan managed to land two wounds on Lurtz, doubling to 4 and slaying the last Uruk hero.

As the game neared it's end, one heroic Wildman avenged his Wildman Hero and managed to shank the wizard in a 1-on-1 fight!

I won 8-0 as despite there not being many of Isengard left alive, the wound tallies were not too far off (roughly 40-32), I had killed his leader and broken them while remaining unbroken.

If I could win this final game, I could potentially podium!


Game 4- Capture and Control (Vs. Mitch (Pits of Dol Guldor LL))

Opponent's Heroes- Azog, Keeper of the Dungeons and Gundabad Captain

Opponent's Warriors- Fell wargs, Hunter orcs and Gundabad orcs

Oh no...Azog! 😂

I was drawn against Mitch, who I have had many closely fought games with in the past. He had brought the Pits of Dol Guldor legion and I knew this was going to be a hard one. I thought I'd have to simply tag as many objectives as possible, hobble his manoeuvrability by slaying the wargs and just have to do my best to hold him down or kill him. Usually, I'd just feed Azog a token kill a turn, but with his free Heroic Combats that wouldn't be an option this time. 

We began with Mitch slamming into my frontline at the centre. I charged Gorulf into some orcs on the left and flew my Crebain to take an objective behind the woods to the right and another to my rear. Azog unsurprisingly killed his opponents and flew into the next. For whatever reason, I had only put one roadblock in the way and not left another for next turn...Whoops.

On my left flank, Mitch tore my army apart as I was losing the fights despite the Banner, wasn't having a lot of luck with the roll offs and his high strength made me suffer for it. Gorulf had the Keeper Heroic Combat into him and took a wound.

The next turn, Mitch swung Azog into my Banner and killed it. My Crebain managed to get hold of Mitch's wargs and killed them off, giving me an advantage. The following turn, Azog charged again and I saw a chance...I charged both my Chief and Thrydan into the same orc, put a total of four men onto Azog and when Mitch called his Heroic combat, I called one with the Chief and a Heroic Strike with Thrydan. Mitch immediately saw the danger, but was stuck with seeing it play out. Azog went first and killed 3 of his opponents. Then Thrydan went up to F7 and with the Chief, easily slew the orc. He then charged Azog but I had overestimated the gap again by sight and couldn't get the Chief in through too. We rolled the fight and Thrydan fluffed, getting a 2 highest with no banner in sight. Azog, understandibly unimpressed with such sneaky attacks, gave him a good thumping and slew him.

I was in a very tough spot now, Azog was more or less free to do as he pleased, still having 4 might on him. Gorulf evened out the tables somewhat by killing the Keeper with a well timed piercing strike and somehow, we had managed to break Dol Guldor just after we had. My Chief failed me for a second time today, as he failed his stand fast (again on a 1+2) and fled. Eyeballing the objectives, it looked like I was narrowly ahead and just needed the game to end. It did not, but as the centre was neutralised, I managed to cause the hunter orcs on the left objective to take their stand fasts and all those unengaged failed. I won the fight on the objective and kept it but the game didn't end for a second turn.

The writing was on the wall as Gorulf then fled, ending my chance of seizing the left objective and allowing Azog free reign to claim the centre and the one in his half, turning what could have been a 7-6~ victory into a 10-3 defeat. But we had a very close and fun game, I felt I could hold my head high that I had made it hard for him.


Mitch ended up coming third after his victory against me and Darren pointed out that my Dunlending fleeing to end the game, had in fact prevented him from claiming the Gold (Sorry..). I, myself, had fallen into 10th with 2 wins and 2 losses, having scored 21VPs (the tie break). 

It was a great day of games and I'd love to attend another, when it comes up!


Upcoming tournaments that I'll attend

4-5th Dec- (Basically) Thrones of Skulls- Fellowship and Glorfindel (1000pts)


12th Dec- Courage is found in unlikely places- Breaking of the Fellowship LL (600pts) A local tournament, hosted by Josh as a send off for the year. Was pleasantly surprised, when my better half insisted that I go!


8th Jan- A Rumble in Rhovanion- The Three Trolls/Theodred's Guard. A kinda local Good and/or evil 400pt tournament.


Assuming that I get time, I hope to write up these tournaments too!

Friday 12 November 2021

Tournament Report – The Battle of Unnumbered Tears

A few weekends ago, I headed up to Sanctuary Games in Sutton-in-Ashfield (just outside of Mansfield, near Nottingham if you’re unfamiliar with the area) for the Battle of Unnumbered Tears GBHL Event, hosted by Owen Wright and GBHL veteran (and former champion) Ed Ball. This is a 100 point event, consisting of 7 games played across two days.

In honour of the upcoming Amazon Prime TV series, players had to select a 797 point good or evil army for the event – 797 being a prime number!

Having played good at several previous events this year, I decided to dust off (quite literally, as it had been sitting on the shelf for ages!) my Haradrim army. With 797 points to play with, I decided to bring in the big guns – a mighty Mumakil!

My full force was taken from The Grand Army of the South Legendary Legion, and consisted of:

Suladan the Serpent Lord, on an armoured horse (my Leader)

7 Serpent Riders

Raza, Fang of the Serpent

12 Haradrim Warriors armed with spears and a banner

War Mumak of Harad, upgraded with a Beastmaster Chieftain, Tusk Weapons, and rappelling lines

11 Haradrim Warriors with bows

797 points on the nose!

My hopes were for Suladan and the Serpent Riders to run around and harass my opponent's forces, the Mumakil to stomp over everything whilst the archers shot anything not trampled, and then for Raza and the spearmen to mop up whatever was left. 

As for the Mumak's upgrades, the Beastmaster was a no-brainer. He comes with three might points, giving you the option for a heroic move, plus a courage value of 5, meaning passing the courage tests required when the Mumakil is wounded becomes a lot easier! Tusk weapons are also very useful, as you inflict four Strength 9 hits when trampling instead of three.

Rappelling lines is a little used upgrade, but if used effectively it can be very good indeed – on the roll of a 2+, a model in the howdah can be placed in base contact with the Mumakil and then move as normal. Be careful if you roll a 1 though – your model will then take falling damage, and from the mumak's howdah, you'll take at least FIVE Strength 3 hits. Ouch!

Raza is also a useful character to take – nominate 1 hero in your opponent's army, and if Raza is in base contact with them during the Fight Phase, he gets a +2 bonus to his fight value. With Heroic Strike and Bane of Kings (meaning he re-rolls failed To Wound rolls), he should be able to finish off his target with ease. 

As for the Legion, it has some great bonuses – the mumakil (which already causes terror), gains the Harbinger of Evil special rule, meaning all enemy models within 12" suffer a -1 penalty to their courage. The best one, however, gives your leader a free heroic action when they're in combat with your enemies' leader – having those saved might points later in the battle can come in very handy!

With my army selected, I was ready for the 7 games ahead!

DAY ONE, GAME ONE – TO THE DEATH!

My first game of the weekend was against Ben Davies and his Easterling Horde, consisting of Amdur on horse, Khamul the Easterling on a Fell Beast, an Easterling Captain, a number of Black Dragons, 6 Dragon Cult Acolytes, Easterling Warriors and Archers and a couple of Black Dragon kataphracts. Not an easy army to play against – Easterlings have a very high defence, and Amdur is very dangerous in close combat. Add Khamul and his magic, and I was in for a tough game. 

Unfortunately for Ben, he'd never played against a Mumakil before, so I explained exactly what it's capable of. He set his army up in a huge shieldwall, intent on stopping the Mumakil before it could move – it's a lot less dangerous if it's not moving. 

To the Death! is a very straightforward scenario – charge forward and do as much damage to the enemy as possible. I sent my cavalry on the left flank, not wanting to charge them head-on into a wall of Easterling steel. Raza and the spearmen went up the right flank. 

Ben had some early success, winning a heroic move and stopping the Mumakil moving, and then taking two wounds off of it. Fortunately, the Beastmaster passed both courage tests – if he'd failed, Ben would have been moving the Mumak the next turn. My archery was pretty ineffective, bouncing off the Easterling's armour, even with the ability to re-roll 1s thanks to the Poisoned Arrows special rule. 

On the left flank, Suladan and the Serpent Riders charged into the Easterling archers, making short work of them. Raza engaged Khamul on the right, but those combats came to a standstill, as Raza won the fights thanks to his special rules, but failed to wound the high defence wraith. Then came the crucial turn – Ben won priority, so I called a Heroic Move – Ben countered, but the roll-off went my way. 

The Mumakil promptly moved forwards, and it was devastating. By the time its move came to an end, 18 Easterlings had been trampled by the beast, including Ben's captain and his banner bearer. The Mumakil came to a stop after running into Amdur, inflicting two wounds but crucially not killing him, meaning the Mumakil stopped. 

As Khamul and Raza continued to trade blows, my Haradrim mopped up the remaining Easterlings that hadn't been trampled. Amdur bested the Mumakil in combat and inflicted another two wounds – I promptly failed the courage test, meaning it would stampede the next turn. However, I'd inflicted enough casualties that Ben's army has been reduced to below 25% of its starting number, meaning the game was over. My banner bearer was still alive, and my army was unbroken, whilst both of our leaders were unharmed.

Result: 9-0 win! Ben was a great opponent to play against, putting up a great fight against the Mumakil despite never having played against one before – he walked away with my Most Sporting Opponent vote for the weekend. Anyone who can still smile after losing 18 models in a single turn definitely deserves it!


DAY ONE, GAME TWO: ASSASSINATION

My reward for my initial success was a top table clash with the Middle-Earth SBG rules writer Jay Clare. I've met Jay at a many GBHL events and he's a very down to earth person – he loves playing the game as much as he enjoys writing the rules for it – although he did need a few reminders as to my army's special rules, as he's written so many different ones!

Jay was using his trusty Laketown army – Bard the Bowman, Gandalf the Grey, Bilbo Baggins, Percy, Sigrid, Tilda, Alfrid and a horde of Laketown Militia. Assassination is a tricky scenario as you have to nominate an enemy hero to kill (except for the leader, who can’t be targeted), and a model in your army who is the assassin – we both joked about the Mumakil being an assassin – not exactly subtle!

With only two heroes to choose from, Jay had it slightly easier than I did – he chose Raza as his target, and I chose Sigrid. Jay also knew if he came at me head on it would go badly for him – he wisely chose to stay in his deployment area, forcing me to come to him. This also meant I'd have to suffer his archery, which was brutal. Bard's bow, which is Strength 4 and can potentially shoot a maximum of three times in the Shoot Phase, took out the Beastmaster. Gandalf then Commanded the Mumakil into charge range, and in the subsequent combat, the Mumakil was beaten and took several wounds. 

With only Courage 3 to pass the test with, I promptly failed. My archery did however take out several militia, along with Alfrid. Annoyingly, I hit Sigrid with several arrows, but even with her low defence and poisoned re-rolls, I didn’t score any wounds. The next turn, Jay stampeded the Mumakil off the board, leaving the rest of his army free to mop up the rest of my Haradrim. 

Suladan however, was defiant until the very end – the free heroic action he received for being in combat with the enemy leader allowed me to take a wound off of Bard, but in the end I was overwhelmed by the sheer numbers Jay had at his disposal. He's been using Laketown for several years and knows exactly how the army works – by the end of the game, I had been completely wiped out. 

Result: 1-12 defeat. Had I killed Sigrid, it would only have been 6-12, but sadly it wasn't to be. Regardless of the result, it was still a very fun game. 


DAY ONE, GAME THREE – COMMAND THE BATTLEFIELD

The opposite scenario to Hold Ground, Command the Battlefield is all about holding the corners of the board, rather than the centre. I was up against Elliot Hamer, who was running the Ugluk's Scouts Legendary Legion. 

Command the Battlefield is a Malestrom Scenario with rolls to determine where a warband enters the table. Unfortunately for me, Suladan's warband was the only one to arrive, whereas the majority of Elliot's did – Suladan was alone against Ugluk, Mauhur, Snaga and a host of orcs and Uruk-Hai. By the end of the second turn, nearly all my cavalry had been slain apart from Suladan and two riders. Fortunately, the Mumakil then arrived, trampling a number of orcs and uruks as it moved onto the board. Suladan then took advantage of the legion bonus to declare a free heroic strike, having charged into Ugluk, and promptly cut down the Uruk-hai leader. 

Mauhur managed to tie up the Mumak for several turns, but once he'd run out of Might, the Mumakil promptly moved forwards, trampling him, Snaga, and a further half a dozen orcs and uruks. By this point though, Raza had still refused to turn up (I rolled a 1 for his reinforcement roll FOUR turns in a row). The remaining orcs and uruks fled towards the remainder of Elliot's army in one corner of the board, pursued by the Mumakil. Suladan and the surviving cavalry set about clearing up the orcs and uruk-hai left in the other corners. 

Raza and his warband finally arrived, and set about clearing the remaining orcs and uruks from the board. The rappelling lines came good in this game, allowing me to drop several archers off in one of the corners and move the mumakil towards the remaining forces. By this point, Elliot's army was broken, and he suffered the misfortune of Grishnakh failing his courage test and fleeing the board. Raza then slew his remaining captain, whilst a well-placed Heroic Move allowed the Mumakil to trample several more orcs. 

At this point, the game ended. I held three corners, whilst the fourth was contested. Elliot's leader was slain, whilst Suladan was unwounded and my force was unbroken – another victory for the Haradrim.

Result: 10-0 win. A tricky scenario – but the Mumakil entering the board and trampling models straight away made a big difference – it then won me the game as I was able to run over most of Elliot's army with it. 


DAY ONE, GAME FOUR – BREAKTHROUGH

For the final game of Day One, I was up against Callum Fairbrother, who had brought Thorin's Company – Thorin, Balin, Dwalin, Kili, Fili, Oin, Gloin, Bifur, Bofur, Dori, Nori, Ori and Bilbo Baggins. Breakthrough is another tricky scenario – two objectives are placed on the centre line, with another in each deployment zone – the focus of the scenario is taking the objective in your opponent's deployment zone. 

This was a tough game that swung in both player's favour. The Haradrim had the early success, calling a heroic move, with the Mumakil trampling Gloin and wounding Fili, and Suladan slaying Bofur. In a surprise twist, Dwalin failed a heroic combat and had to use all his fate to survive. The dwarves then struck back, wounding both the Mumakil, Suladan and killing Suladan's horse. Oin then fell to the Haradrim's archery, but the Dwarves wounded the Mumakil and I failed the courage test. Despite calling a heroic move, Suladan and the banner bearer couldn’t get out of the way and was promptly trampled by the stampeding Mumakil, along with several Haradrim and Serpent Riders. 

The Haradrim however, refused to be cowed. Raza charged and killed Balin (helped by his special rules as he was facing his target). Ori fell to the Haradrim's archery, as did Fili. Bilbo however put on the One Ring, and with Dori by his side, headed for one of the centre line objectives, both of which I held, with a few spearmen on each. Thorin kept the Mumakil occupied, charging it multiple times and preventing it from moving. 

By this point, the dwarves were broken – Dori subsequently failed his courage test and fled, whilst in another twist, Raza slew Dwalin and Kili in the space of two turns. By this point, Thorin and Bilbo were the only models Callum had left, with Thorin down to one wound and no fate. At 25%, the game came to an end. I held my own objective and one of the centre line objectives – the other two were contested. Suladan was dead, Thorin wounded. The difference was breaking – Callum's army was broken, but I was just one model away…

Result: 4-2 win. A really close game that could have gone either way. Callum had some really bad luck – he didn’t pass a single fate roll in the whole game – Dwalin should also have performed much better than he actually did. Perhaps with a bit more luck, he would have dominated the game a bit more. 

By the end of Day One, I had three wins and a single defeat. Day Two looked very promising, although I would be potentially fighting on the top tables. 


DAY TWO, GAME FOUR – DIVIDE AND CONQUER

Another difficult scenario, and very tricky opposition. My opponent, Rowan May, brought a very unusual force. A host of wood elves led by Galadriel, including four Wood Elf Sentinels. Allied to that was a Rohan contingent, led by Theodred and Grimbold, including a mounted captain, three mounted Royal Guard and a dozen Helmingas. The way the terrain was positioned also meant that manoeuvring the Mumakil would be difficult – I wouldn’t be able to simply trample all over my opponent's army. 

Divide and Conquer makes you split your army into two and deploy them in opposite corners. I deployed my cavalry and infantry in one corner, and the Mumakil in the other. Rowan's cavalry went in one corner, and Galadriel and Grimbold set up in the other with their warriors. I went straight for the central and western objectives, whilst the Mumakil advanced towards the cavalry, shooting as they went. 

A well timed immobilise from Galadriel saw my route to the centre cut off, so my cavalry headed towards the elves and Rohirrim, whilst several of my spearmen claimed the western objective. Elven shooting proved deadly, taking out a Serpent Rider whilst unhorsing another. In a disastrous turn of events, Suladan took two wounds from the archery. 

Suladan however saw his opportunity the following turn and charged headlong into Galadriel, whilst the Serpent Riders charged into the elves and Helmingas. Theodred and the Guard marched towards the centre, chased by the Mumakil – two Royal Guard fell to the poisoned arrows, as did one of the Sentinels. Suladan then took advantage of the army bonus to call a free heroic strike, winning the fight and knocking over both Galadriel and Grimbold, who had rushed to her aid. Suladan promptly inflicted two wounds on Grimbold, who was saved only by his fate. Galadriel was also forced to spend all her fate points, taking a wound. Suladan charged again the following turn, called another free heroic strike, winning the fight and taking the final wounds of both heroes - Grimbold and Galadriel were both dead!

Unfortunately for the Serpent Lord, he was now surrounded by a host of foes and now only had one might point left. He promptly spent his last might point to call a final Heroic Strike, slaying the second and third sentinels, but was brought down the following turn by Theodred. 

By this point, I'd rappelled several archers out of the howdah to claim the eastern objective, and held the central objective, but by now a host of elves and Rohirrim were closing in. The final sentinel was able to drag one of my models away from the eastern objective, whilst the other was cut down by elven archery to hand the objective to Rowan. In the final turn, with the western objective firmly in my hands, the focus was on the central objective. The Mumakil trampled over Theodred and several elves to clear most of Rowan's models, but the captain and the remaining Sentinel still contested it. 

In the end, whilst I had more models within 3" of the centre objective, they were all in the Mumak's howdah – and the rule is the 3" around the objective only extends 3" up – they were too far away! With both armies broken, and both leaders slain, Rowan held the central objective and took the victory. 

Result: 5-8 defeat. A tough one to take when you lose the game on a technicality – even my opponent admitted it was harsh. But at the same time, you have to follow the rules. I could have won the game if I'd rappelled my models out of the howdah and crowded the objective, but I didn’t. An important lesson learned!


DAY TWO, GAME 6 – DESTROY THE SUPPLIES

Another fun scenario, but a very difficult opponent – GBHL veteran and League Winner, the appropriately named Will Champion! Will had brought a very compact but powerful force – Treebeard (with Merry and Pippin), Quickbeam, Beechbone, Gandalf the White on Shadowfax, Damrod and a Minas Tirith banner bearer. 

Fortunately, I had manoeuvrability on my side. I left a few Haradrim behind to guard my supplies and headed forwards, shooting Will's banner as I did. Unfortunately, Gandalf controlled the Mumakil more than I did, Commanding it both into a building and into combat, where it was pulverised by the Ents. Fortunately, several of the crew survived the fall, including the Beastmaster, who survived five Strength 3 hits!

With the Mumakil gone, the Ents turned their attention towards the rest of my forces. Beechbone, Merry and Pippin were left to deal with the surviving crew, whilst Treebeard and Gandalf headed towards the rest of my force. Luck however was on my side – Quickbeam bested but failed to kill a Serpent rider I had perched on the first supply marker. The following turn, Suladan called a heroic move and charged Quickbeam with several Serpent Riders, ensuring that supply marker would be destroyed. My Beastmaster also raced to the third supply marker, whilst the other surviving crew engaged Beechbone and the Hobbits.

I then had my second piece of luck – Beechbone won his fight and barged the Haradrim out of the way – a 2+ would have meant him charging my Beastmaster, but Will only rolled a 1! Another supply marker destroyed! Merry then fell to the other crewman, whilst the Ents and Gandalf made a mess of my forces, slaying Suladan, Raza and my banner. Damrod however was not so lucky and was brought down. A loan Serpent Rider then made for the final supply marker, cutting down Pippin in the process. However, by this point I was below 25%. Will had broken me and killed my leader, but I'd destroyed two supply markers – the game was a draw!

Result: 4-4 draw.


DAY TWO, GAME SEVEN – LORDS OF BATTLE

The final game of the weekend was a rematch against Will. Unfortunately, this did not go well for me at all. Lords of Battle was the one scenario Will had wanted all weekend, and he got it. The Ents proceeded to annihilate my cavalry, and then my infantry in very short order. Gandalf Sorcerous Blasted the Beastmaster off the Mumakil, which the Ents promptly turned their attention to. The saving grace was the game ended before the Mumakil could be killed – it only had two wounds left. 

The whole game lasted just under half an hour, and I only managed to score 4 wounds, these being Damrod's wound and fate point, and one wound and one fate on Quickbeam. By contrast, Will scored 38 wounds… 

Result: 0-12 defeat. A 30 minute 12-0 thrashing was definitely not the best way to end the weekend. However, Will was very gracious in victory, admitting any other scenario would have produced a different result. 


SUMMARY

I finished the weekend with three wins, three defeats and a draw, finishing 27th out of 50 players. Not a bad return, considering the Mumakil is a very big points investment in the army, but it performed excellently – particularly in Games 1, 3 and 5, where it's presence made a big difference – the fact it has Harbinger of Evil in the Legendary Legion makes it much harder to be charged. The tusk weapons also made a difference – an extra Strength 9 hit can help inflict that extra wound to finish off a hero that otherwise would have stopped it moving. 

Suladan was excellent – his banner helps troops around him and the ability to call a free heroic action thanks to the Legion Bonus was a big difference – he slew Ugluk, Bifur, Galadriel and Grimbold over the course of the weekend, and was able to wound Bard the Bowman. He even went toe to toe (or rather twig) with Treebeard for a few turns in Games 6 and 7. A seriously underrated hero in my opinion!

Raza also proved useful – his special rules came in very handy for killing off heroes, especially in Game 4 – slaying Dwalin, Balin and Kili in a single game is a pretty good achievement. He struggled in Game 5, and was outmatched against the Ents, but if you pick the right hero to target, he can really come good – he even went up against Khamul in Game 1 – if it wasn't for the Ringwraith's natural toughness, I may have claimed a bigger victory.

The event itself was excellent – very well organised, a fun mix of games and a nice variety of opposition – Easterlings, Laketown, Uruk-Hai and Orcs, Elves, Rohirrim, Dwarves and Ents. The venue was great too – well lit, not too hot or cold, plus a nice selection of drinks and donuts available too – what more could a Strategy Battle Gamer want?

Hope you've enjoyed this write-up – keep an eye out for more in the future!

Until then, Happy Wargaming!

TheTolkienNerd

Tournament Report- The Eastern Expansion (20th April)

 Hey all, it's been a little quiet on the blog front for a while as James and I have been working on our Seven Stones army (more to come...