This was two busy months that I've just had, with a lot of prep for Seven Stones, followed by a couple of fun conversions for a local silly buggers tournament coming up next weekend (8th July).
Firstly, in prep for Seven Stones, I had to paint up/redo several Rivendell elves. But before that, I kicked off with painting up all the bases that I would need. Many of you would recognise the work of Matt Davies.
These were done with Dryad Bark for the dirt, Rhinox Hide for the Bark, Steel Legion Drab for the inner wood, Castellan Green for the vines, Dawnstone on the rocks and Skrag Brown for the leaves.
The first models that I got done of the bunch were the unarmoured sons of Elrond. I had Elrohir for years but at some point had lost the Elladan, who was replaced though a quick eBay purchase. Attaching metal models to the bases with some pinning, I decorated them with some summery flock and a small pinch of dead leaves.
Next up, I did a refresher on an old High Elf Captain, including a change of colour on his cape. From Kantor Blue to Incubi Darkness, I figured that the small change would just help him and the warriors pop a little more.
Happy with this colour scheme, I then did the same repainting a load of old sword warriors and getting some bowmen out of the grey pile.
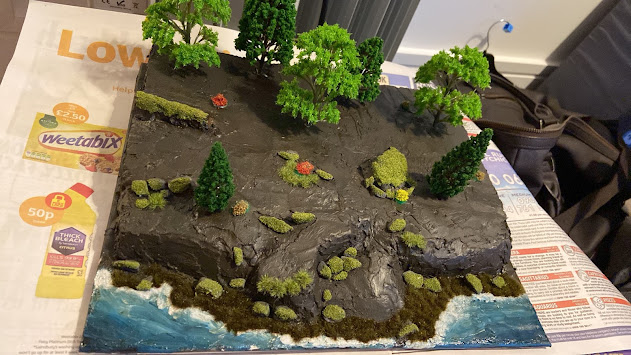
With the army done, I decided to crack on with the display board. The idea that I wanted to go for was a riverbank on the edge of the woods. I also decided to try polyfiller for the first time with it.
I went and bought a cheap and cheerful wooden photo frame, removed the glass and wrapped it in newspaper. Before marking out roughly how I would want the board's layout to be e.g. river, cliff etc.
After this, I dug through my bag of polystyrene and threw together a rough design. I figured that the smaller pieces at the front could be painted and flocked to make it looks like a collapsed riverbank. I used a couple of other pieces to make a fallen tree and boulder to flesh out the plain/forest.
Then came the time for the polyfiller, I was very nervous about this as I had never tried it before. However, despite a very rough appearance and a few gaps, I was happy with it. I then added some sand along the riverbank and up at the top to create a nice dirt/mud appearance to blend them better into the rest of the scenery. This was then all sprayed.
I could now begin some painting. I had grabbed some cheap acrylic blue and white paints and applied a nice layer of blue over the river. Before then adding the white, while still wet, and blending them together, adding more white at the banks. I didn't smooth it out as the build up gave a nice appearance of foam. I gave it a green wash with Athonian Camoshade, to give it the colour of a murky river. Once dry, I added a glaze of 1:2 PVA glue/water, to give it a nice wet and shiny look that made the water look a little more realistic.
With the river sorted, I painted the rest of the board with a cheap brown acrylic. Going back and using the same recipes as above for the rock and fallen tree.
It was now time to apply some decorations, I began by placing the rocks that I had got out of my tub and painted as above. Then I put individual tufts of long grass to make reeds along the river.
Now it was starting to come together, as I put some of my old fashioned flock onto the rocks and fallen tree to give them a mossy appearance. And to give more life to it, dotted some wildflowers around.
As all of those things dried and set a little more, I took the photo frame and decided to attempt some calligraphy. I first looked up the title for the film 'Born of Hope', since our theme was the Death of Arathorn and copied it onto the front. Starting with pencil to mark it out and Sharpie to imprint it.
I then did the same to the left and right using an elvish script for my name and a mannish looking one for Allan (I found these on various sites through Google).
I finished up by adding the flock to the display and then putting the frame back together around it.
And here is the finished display with both our armies upon it.
Right, with Seven Stones done, it's back to the relatively unfocused and random. A couple of weeks later, I had an event to attend with Goblin town, where I needed to repaint a cheeky three warriors. This was a nice easy task after all the work on the previous project so I chose that to get me back into the swing of it.
Next, heading later into June, with another tournament approaching, I required a second Batswarm (included in the list to get me to keep ticking off the Moria models). I forgot how time consuming this one was, even though I went for a pretty simple approach.
I also needed a few Goblin archers and so polished off the last 10 of them too.
At the very end of the month, I slipped in a couple of Giant Spiders too.
Now just to cut back a bit, as I'd like to finish this one on a high. We have an event coming up in the EAHC in early July, where we can mount a hero with an armoured horse, even if they usually can't. And in the same vein also give them a shield, Heavy armour and lance. We can also get a banner in the army, even if its usually not available. And if you paint or convert these things, the best painted prize is awarded for the best ones.
Since I had a spare Durburz and almost certainly a broken goblin somewhere, I figured I would make a good go of it.
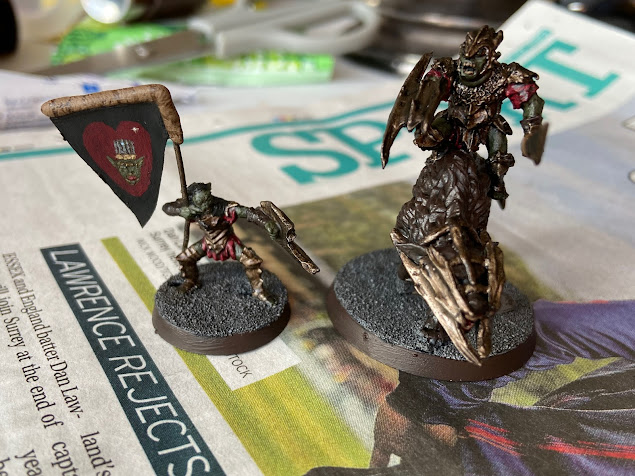
I found a broken archer and removed his quiver and bottom half of his bow. I then drilled a small hole into his hand from either side and used pieces of paperclip to make the frame for a banner.
Greenstuff was used to hold the join together and double as the attachment, while a blue stuff press mould provided a shield.
Finally to complete the build, I cut a small piece of paper to measure and used superglue to stick it in place.
Next, I went to the place all amateur graphic designers turn to...Microsoft Paint, to design my sigil. Since in this event, we have to choose a princess for the upgraded champion to fight for, I chose Groblog (obviously). I then created his visage in a way that I could easily paint onto a banner in a recognisable way...with lipstick added.
Now onto the champion himself. I cut Durburz from his rock and tab, deciding that the squatting pose would work fine. I intended to find a broken warg rider to steal the mount from, but no dice. So improvised with a fell warg. I quickly press moulded three shields, for reasons that will become apparent.
It was time for Durburz to commit and he took the hand drill in the bum without complaint, as did the warg but in the back. I then pinned him to it, to get a nice solid connection. I also snipped off his sword blade and carefully cut away the handle from his glove. I then drilled through that hand and put another paperclip piece through it, superglued in place. I then used greenstuff to wrap around a connection between the end of the wire I had made and the sword blade. Reinforcing it with a thin layer of superglue. This made a lance for Durburz, staying with the Moria aesthetic. The wraps to hold them together, I would paint to look like a leather strap.
I then applied the lance arm back onto Durburz and gave him a shield. This is where the other two come in, as I had been struck with inspiration while mulling over the fact that this was an 'armoured horse'. My idea was to use two shields to make a Moria theme fitting face guard for the warg.
Now the issue with this look was, 'How is it staying on his face?'. So I carefully added some more thin strips of green stuff to make straps to hold it in place. And proudly sent over some WiPs to fellow writer CJ, the TO for this tournament, as he was loving seeing what people were coming up with.
His comment made me make a small change, as he responded with 'I love the face cage on the warg!'
Face cage...ooh that's pretty awesome actually, and definitely fits into the Orcish nature!
'Yeees...face cage...'
With all the building now out of the way, I eagerly got to work on the paintjobs. Using the exact same recipe as I have for Moria throughout. Just using some Deathworld Forest on the sigil highlights for goblin skin on the banner, while Groblog's crown on it was done with Mechanicus Standard grey and Dawnstone Highlights. The wargs fur was Dryad Bark with some Rhinox hide highlights and washed in Agrax along with everything else. As always, the goblin armour got a second was to exacerbate the rusty look. And once they were finished, I was more than pleased with my work!
Well that was a very lengthy painting update, I promise I'll do some smaller scale stuff for the next few months! But after all that, the Moria project is finally getting close to finished! With only 2 Mirkwood spiders*, Druzhag and Ashrak now left. They should be done by the next update and who knows what else with them...maybe a certain King with a lovely for shiny things upon his goat?
*I recently realised that you can't take them in that list, as I had misread Druzhag's rule, but I've been listing them in that target for so long now, that it would feel wrong to drop them from it this late. We're all in this together my eight-legged friends.


No comments:
Post a Comment